Saturday, November 22, 2014

My next bench will have an apron

I haven't written anything here in quite a while, but I haven't been completely out of the workshop.  I built a frame, which I'll write about sometime soon, practiced M&T joints (which make me want a G&T, but that's another issue...), and built some frame-and-panel cabinet doors for a friend.

That last one prompted this post.

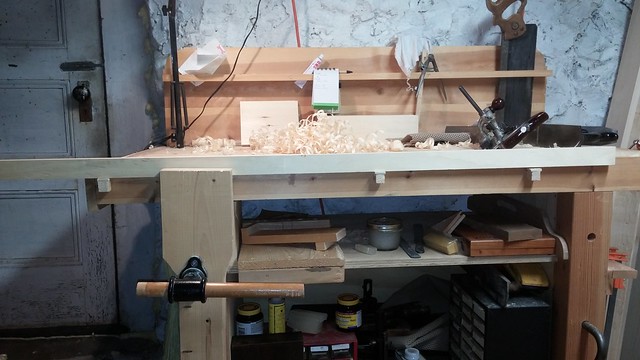
Some of you will have read the post about my bench, and how I built it.  Well, when I built it, I really didn't have a good bench, so I didn't have a lot of experience with the process of actually, you know, using a tool bench, especially for hand-tool intensive work.  Over the past few years I've built some little boxes, a tool chest, a picture frame, and a few other small things.  Well, these cabinet doors are 52" long, which means they're 4" longer than the bench.  That's mostly fine.  Trimming them to length was fine, shooting them was easy, smoothing wasn't an issue.  And then I needed to groove them to take the panel.  I ran into two problems.

First, they're too long to work on on the benchtop.  Normally, I'd use a holdfast to clamp down a batten, bring up the planing stop at the end, and work away.  These are made of 1x2 dimensional lumber, so balancing them isn't an issue, and I've done it before.  But these are longer than the bench, and I just don't have the room to work on a piece that long.  That's fine, that's why I have a vise.

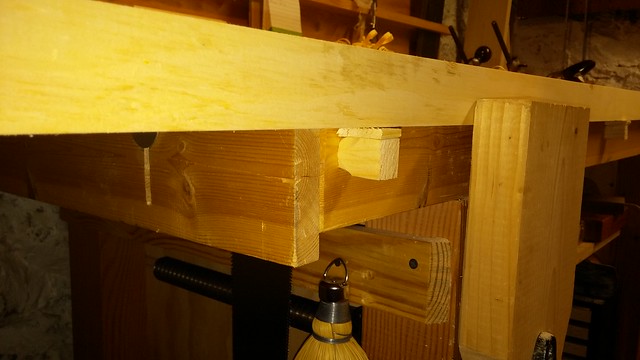
The second problem is that they're only 1 3/4" high.  I can clamp them in the vise, but they're long enough to flex when I start trying to use a combination plane on them.  So I spent 15 minutes drilling holes in the front edge of my bench.  It's about 3" thick, so there's plenty of space, but after the first inch and a half it's drilling into the edge of plywood.  I wound up being able to do the work, but it was a challenge.

This was my test set up, confirming that support from the bottom would be sufficient:


20141107_203451


I basically just put two long clamps from the front to the back, and propped the wood on those.  It worked, but the edges of the clamps are thin, and it looked like it would damage the wood.  I could have just clamped blocks to the front of the bench, I suppose, but that's a one-time solution that will take time to repeat.  Nonsense.  Here's what I wound up with.

20141109_124436

20141109_124448


Sorry about the color balance on that last one:  all the photos were taken with my phone, but that one caught the light weirdly.

Anyway, you can see what I did:  drilled some holes, then more-or-less rounded the ends of some blocks, and padded them with 1/8" scrap to move the board up some.

In the end, it worked, but it would have been a lot easier if I had an apron with holes pre-drilled in it, so I could just clamp a support board on.  So that goes on the list for the next bench.

Friday, July 25, 2014

Thoughts on planes

I found myself writing a comment the other day on what planes are best to start with if you mostly use power tools.  The usual recommendations are OK, but frequently include things like a jack plane.  But if you're mostly a power tool user, a jack plane isn't all that useful.  You can use it to thickness boards if they're too wide for your planer, or flatten boards if they're too wide for your jointer, but that's hard work, and not a great place to start.

So what is a good place to start?  Well, there are some tasks that either aren't easy or require a lot of setup with power tools.  I think those are good places to start:  find hand tools that do things that are hard or time consuming with power tools, and easy or fast with hand tools.  So here's my list, in no particular order.


  • A shoulder plane.  This one makes a lot of the lists, for good reason.  Get a wide one; 1", 1 1/2", something like that.  This can tweak tenon shoulders or faces, take a tiny bit off a rabbet that's not quite deep enough, things like that.  With sufficient practice, it can cut a rabbet in the first place, either following a pre-cut shoulder (probably cut with a table saw), a fence, or a knifed line.  If you cut a lot of tenons or rabbets, this is a good plane to have.
  • A rabbet plane.  Something like the Stanley #78 is a wonderful first plane.  With a fence to control the width, a stop to control the depth, and a nicker to allow it to work cross-grain, this is a fantastic tool for cutting one or two rabbets.  If you have gauging blocks, set up is easy:  just set it blade down on the bench with a block under the depth stop to set depth, and on its side with a block under the fence to set width.  Now cut the rabbet.  Setup should take under a minute.  If you have dozens of rabbets to cut, use a table saw with a dado stack or a router table or something like that.  But for a few rabbets, this plane will cut them fast enough that you'll still finish quicker than you would setting up the power tools.  If you make a lot of small projects with one or two rabbets, this is a good plane to have.  If you only do large runs and need dozens of identical rabbets, pass it by.
  • A block plane.  Personally, I don't much like these, probably because I don't have a good one.  But they're nice for chamfering edges, tweaking joints that aren't quite level, and things like that.  They're small enough to put in a pocket, so there's no reason to ever not have one in easy reach.  If I were buying one new, I'd buy either a low angle model or one with an iron that goes all the way to the outside edges so I could use it instead of a shoulder plane for cleaning up tenons.
  • A grooving plane.  This could be a combination plane. It could be a plow plane.  It could even be an old wooden plane with a fixed fence that cuts a single width of groove at a fixed distance from the edge of a board.  Whatever, it's a useful tool.  Use it for grooving the rails and stiles of a door.  Use it to cut the groove to hold the bottom of a drawer.  Working in small stock, it's easier and safer than a table saw or router table, and for a single drawer or door setup is likely to be a lot faster.  Veritas makes a nice small plow, and I've seen good reviews of the Mujingfang plow plane, which is a steal if it's actually reasonable quality.  Again, if you make small projects with just a couple of grooves, or a lot of furniture with only one drawer, this is a great tool to have.  If you're trying to outfit a whole kitchen, you should probably take the time to set up a power tool to do the job.
  • Moulding planes.  Now that I have a beading plane, I think everyone should have one.  Mine is in terrible condition, but I can cut a bead in the edge of a panel in a few passes.  Once I've got it cleaned up, that won't change, but it will jam less frequently and may be able to handle cross-grain if I'm careful.  Bead the edges of your shiplap or tongue-and-groove cabinet backs.  Put a bead into the outer corners of table or desk legs.  It'll dress things up, and help protect the corners.  I paid ten bucks for mine at a flea market, and it will be perfectly useable once I've spent a little time tuning it up.  Doing beading with a router works, but I'm not actually convinced it works faster than a beading plane.  If you like beading the edges of things, or you just see one of these in good shape cheap, buy it.  If you pay ten bucks and use it half a dozen times, it was money well spent.

Once you have as many of those as you have a use for, think about a small smoothing plane.  I like my #3 and #4;  I use the #3 more often, partly because it's higher quality, and partly because I mostly work on small pieces these days, and they tend to vanish under the #4.  Use your smoother to take out the ripples left behind by a jointer or planer, and to make very fine adjustments in the width of a narrow board.  A jointing plane is better for that, but a smoother will work if you're careful.  

Only once you have all of those would I consider a jointer plane and jack.  If you're dimensioning with a table saw, jointer, and planer, you just shouldn't have much need for them.  They're fun to have, and occasionally useful, but the others will likely get used on almost every project.  A jointer and jack may get used a few times a year, if you're careful about what lumber you use.

Monday, June 23, 2014

CTR 9: Mujingfang hollow and round, 1/4"

UPDATE:  Now there are photos!

As you should guess from the title, this is a review of some of the inexpensive hollow and round planes you can find at Lee Valley and other places.  Overall, my experience has been fairly positive:  in line with others in the CTR (Cheap Tool Review) line, I'll be fairly forgiving of minor problems.

One note:  I'm using "hollow" to mean the body with a concave sole, and "round" to mean the one with a convex sole.  I'm pretty sure that's right, but if it's not, at least you've had warning.

Where, and How Much?

The pair I got were a gift, and I'm not sure where they were purchased.  Lee Valley carries them (here), at $20 each, or $37 for the pair.  Prices increase as size does:  a set of 12 (six different sizes) is about $250.  Japan Woodworker also has them, although as I write this it looks like they only have two sizes in stock.

What do you get, and What's the Construction Like?

Each plane ships in a cardboard box containing the plane body, iron, and wedge.  In the case of my planes, the construction is reasonable.  The body is some kind of hard wood (the site claims a type of rosewood), and is well finished on the outside.  The inside of the mouth is rough, especially on the front:  the bedding surface is better, but still not polished smooth like the outside is.  That seems to be the philosophy behind these planes:  where your hand will touch it, or where it touches the work, make it perfect.  Everything else can go hang.

The wedge, in mine, fits well:  it slides into place easily, can be tapped tight fairly simply, and (mostly) directs shavings where they need to go.

The iron, similarly, is reasonably well shaped (better on the hollow than the round), but fairly rough everywhere except the final inch or so.  Since that's what's necessary for it to work, I don't really have a problem with that.

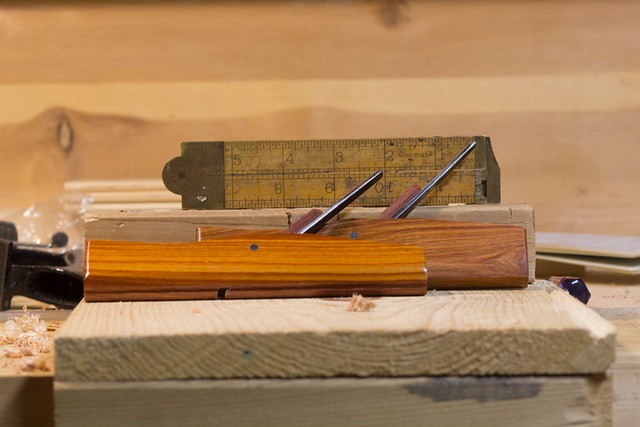
One final note:  these things are tiny.  Miniscule.  "Don't sneeze, they'll blow away with the shavings" small.  Lee Valley claims they're around six and a quarter inches long, which I might believe, but they seem smaller.

HR Planes with rule
Tiny, I tell you!

 How do they work?

I'm going to start with a disclaimer here:  these are the first hollow and round I've ever used.  In fact, rabbet and plow planes excluded, these are the first moulding planes I've ever used.  My review, therefore, is not informed from experience with dozens of planes.  It's based purely on the out of the box performance with no real expectations.

Next, a note on usage.  From what I've read, it's not really reasonable to just start cutting with a hollow or round.  A round should have enough of a rabbet cut that the iron makes contact at two places initially, and the hollow should be starting in such a way that two corners in the wood contact the iron away from the points.  Basically, use a rabbet or plow to take away as much material as possible, and only use the hollow or round to do the final shaping.

That said, how comfortable am I using them?  Fairly.  I tried a few tests.

Setup consisted of lapping the backs, then dropping them into the body and wedging them.  Adjustment was done with a panel-beating mallet, and if I'm going to keep using these I'll need a smaller hammer.

First, a piece of 1x4 pine.  Reasonably straight grained, very soft, and a cutoff I didn't need:  it's about 6" long.  For the round, I made the initial rabbet with my cheap "rosewood" rabbet plane (every time I resharpen it I like that plane more...).  Figuring out how to adjust it took some doing, since lateral adjustment matters more (and is more difficult) than with my other wooden planes, but once I was done it worked fairly well.  There's one quibble, but I'll discuss that in a moment.  For the hollow, I used the same rabbet to chamfer an edge, and worked from there.  Again, it worked pretty well.

So, what's the quibble?  The mouth kept clogging.  I don't know if I had the iron set wrong, if the wedge is shaped badly, or what, but the mouth doesn't clear as well as I'd like.  I feel like this is a flaw in the design:  a side-escapement plane should have less trouble, I think, because it's not trying to spit shavings up out of the top, past a pin. I'm really not sure, though.

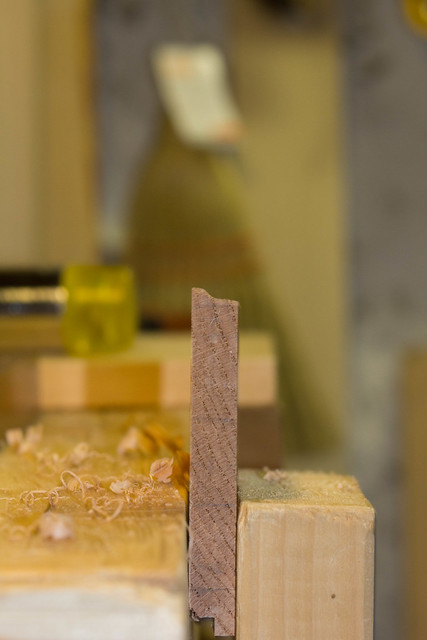
Regardless, I ended up with a rather nice ogee profile in the edge of the board, about 1/2" wide.

The second test was in red oak, and that was a little rougher.  On the one hand, they did, technically speaking, work, and they mostly left a smooth surface behind.  On the other hand, there was some tear out, particularly at the ends of the boards, which was odd since I was running with the grain.  I think having the irons at a higher angle might help, but the end result was acceptable.  I suspect a lot of the problem was my lack of experience and odd grain in the oak, and better stock choice would help a lot.

HR Plane Test
Not bad, for a first attempt!

Final Thoughts?

For thirty six dollars, these are hard to beat.  Given that most companies selling hollow and round planes want $100+ for just one plane, it's probably impossible to beat.  Even building your own, if you buy tapered irons you're going to spend more than $18/plane:  a 1/4" iron from Lie Nielsen costs $15 before shipping right now, so unless you can buy your wood for less than $3 you're out of luck, costwise.

The quality is acceptable, if not fantastic, and I suspect that as I learn to use them they'll work better.

One final note is that there's an oddity to these planes, compared to Western ones.  On a Western style round plane, the body is straight vertically on one side (usually) and tapered vertically on the other side.  That means you can cut a fairly large part of the circumference of a circle with one.  These planes have a flat on each side of the convex part, which limits what you can do with them.  That's certainly not a dealbreaker, but it's something to consider.

Would I buy another?

This is an odd one.  The answer is no, but not because I don't think they're worth it.  As I said above, the price is unbeatable.  The reason is that I acquired some nice maple, and Lie Nielsen started selling tapered moulding plane blanks, and I think it would be interesting to make my own.  That way I can get a much larger range of sizes, and I can get the Western profile, which I prefer.  But if you want a small set of hollows and rounds, and you don't have the money to buy new Western style or the patience to find and rehab old ones, these are a good choice.
Saturday, March 29, 2014

Consumerism, or, A Tale of Two Squares

I received an ad via email this morning for the Woodpecker 12" Square.

It looks like a fantastic tool:  it's got a 12" blade and an 8" handle, the blade and part of the handle are machined from one block of aluminum, and the remainder of the handle consists of more machined aluminum slipped onto reference pins.  It should stay square forever unless you beat on it with a hammer, and it's guaranteed to 0.001" accuracy.

Then I looked at the price.  $99.99, for a square.  yes, it's an accurate square, and yes, it's almost certainly well made, but still.... a hundred bucks for a square?

Let's look at an alternative, which happens to be the same brand as my 16" and 6" squares.  It's a combination square, made by Empire Level.  it has a 12" blade, although the equivalent of the Woodpecker's handle is only about 4" long.  It, too, is guaranteed to 0.001" accuracy over its length.  It costs about $15, or about 1/7th of what the Woodpecker costs.

Now:  The Woodpecker tool has some advantages.  First, the rule starts measuring at the edge of the board, not at the end of the blade, which means measuring with it is easier.  Second, it's been designed to be a little easier to hold.  Finally, it has a much larger registration surface, so it will be easier to keep it where it ought to be.  All of those, particularly the last one, are valuable, and if cost were no object I'd probably buy one of each.

But...well, most of us have budget limitations.  As I mentioned, I have one of the Empire squares in a 16" size.  It's a little awkward at its full length, which probably extends about 13" from the board edge, but I've used it a number of times at that width with no real problem.  It's accurate, it's repeatable, and it's cheap.  For my money, it's easily a fair trade off.  Here's a case -- one of the few cases, probably -- where you can easily go cheap, and not have to worry about giving up accuracy, quality, or longevity.


Tuesday, March 25, 2014

Woodworking and the Joy of Acquisition

The scene:  A small room, with a circle of people in uncomfortable chairs.  A group moderator stands up.

"Well, we have someone new with us today.  Why don't you introduce yourself?"

"Hi.  I'm Andy, and I have a problem.  I'm a tool collector."


The crowd replies, and then the moderator speaks again:
"Hi, Andy."
"Welcome.  And as you know, the first step is admitting that you have a problem."


Ok, I'll stop now.  But I'm starting to feel like I have a problem.  Here's the thing:  I can't see a new hand tool without wanting it.  Fancy molding planes.  Sets of hollows and rounds.  Saws both fancy and plain.  Smoothers, jointers, toothing planes, even antique screwdrivers!

But you know what?  I have enough tools.  Here's the list of what I need to make it possible to do everything I want to do:

1) A plow plane.  Yeah, I can do the work with a saw and chisel, but not and quickly or accurately.

2) Some more bits for my brace.  Many of the ones I have are in rough shape, and I'm missing some sizes I actually have a use for, like a #12. (3/4")

3) A dovetail saw.  I don't actually have a good backsaw of any variety, but everything I want to do could be handled by a ~14TPI dovetail saw, hand-filed rip.

That's it.  That's all I NEED.  Oh, don't get me wrong... there are other things that would make my life easier.  It'd be nice to have more than one marking gauge, and using a Stanley utility knife for marking is getting kind of old.  But here's what I have regularly and use:

1) Three hand planes.  It will be four, but I haven't got the last one cleaned up.  I have a #4 smoother, a #5 jack with a straight edged iron, and an old transitional try plane most likely made by Siegley.  The fourth is another #5, in much rougher shape, that will have a curved iron and be a dedicated stock removal plane.

2) Two hand saws.  One is a Disston rip saw, roughly 5TPI.  It rips 3/4" stock beautifully, and anything thicker is also fine.  The second is a cheap Shark Ryoba, which I use for cross-cutting, ripping small thin pieces, and cutting dovetails.  I also have a little gents saw that I use if the ryoba is too large, but it doesn't see much use.

4) A set of Wood River bench chisels.  They pare, the cut mortises, they do everything I want a chisel to do.

5) A set of card scrapers.  Every once in a while they're really useful.

6) A good brace, and a couple of usable bits.  The brace drills holes, drives screws, and generally makes things turn when they're supposed to.  Also, an old egg-beater style drill and a lot of bits.

7) A few things for making straight lines.  Two old wood and steel try squares, and a pair of modern mid-quality combination squares.

8) Some basics:  a mallet, a hammer, a tape measure for rough measurements, a couple of pencils, a utility knife for marking things, a marking gauge, little stuff like that.


That's it.  That's what I need.  I probably spent $150 on the tools I actually need.  A good plow plane may run me another $150.  If I can find a decent dovetail saw for under $50, I'll probably buy it and be grateful.  Call it $400-450, max cost for NEEDED tools.

And yet... I have a pile of other saws, and some of them may see some use some day.  I'm looking forward to restoring the panel saws, since they'll fit better in a portable tool box.  I have a Stanley #3 plane that I may get around to restoring sooner or later.  It doesn't need much.  I've got knives, drills, hammers, and mallets that I never touch.  I have three more braces, and I've never used any of them.

And I'm not the only one.  I'm not alone.  Woodworkers, especially hand tool workers, seem to have a driving urge to acquire MORE TOOLS.  We can't pass a flea market without looking for something to buy.

So why is it?

I have some theories.

1) We live in a consumer culture.  Our entire lives we're told that we need to buy, buy, buy.  If you're not accumulating new things, you're LOSING.  "He who dies with the most toys wins," right?  Well, maybe.

2) We subscribe to woodworking magazines.  Don't get me wrong, I love my magazines.  But... have you ever noticed that each review of a new tool talks about all the things you can do with it that you can't do without it?  So we're convinced that the tools we have won't do the job, and that we need new ones.  That's mostly not true, but it doesn't stop the advertisers from saying it is.

3) New tools are fun.  I think this is a lot of it.  It's like getting a new toy;  it's amazing the first day, but pretty soon you're used to it, and you want a new thrill.


All that said, I'm learning to appreciate what I have.  Learning to use the tools I have better, rather than going looking for new ones.  And I think I'm going to get rid of some of the ones I'll never use;  I don't NEED four braces.  I'll get rid of two, and leave myself the best two.  Some of those saws will, after I sharpen them, go back on the market.  Before I give in and buy a new tool, I'll try to think about whether it really will benefit me to buy it.


Lessons from the bench.

I'm learning.  Slowly, but I'm learning.  A few lessons from the workbench...

1) If it feels wrong, it probably is.  I started making a cut today, and it felt pretty awkward.  I decided to keep on with it, because I couldn't see a better way to do it:  the wood I was trimming splintered, and now I've got a slice on the back of one finger where the wood caught me.  The good news is, I was using a handsaw, not a table saw, so it's pretty minor and will heal quickly.

2) Keep your bench clean.  This one is hard for me.  I'm normally... well, I don't want to say "a slob", because to me that implies dirt.  In my space, things are usually clean, but scattered.  Nothing gets put away.  The fact that I have a very limited space to work means that if I don't put things away as soon as I'm done using them, I run into them later.  I just had to stop midway through a cut, because it turned out I didn't have space behind the vise for the sawblade;  the plane I was using a few minutes before was in my way.

3) Trust your eye, not your measurements.  I spent about 20 minutes this morning jury-rigging a way to keep my plane at a 45 degree angle to smooth a bevel I needed to make.  It was still remarkably difficult to get the bevel cut right.  For the second, third, and fourth -- I'm beveling the top edges of a box to take a similarly beveled top -- I said "forget it, I'm doing it free-hand."  So I marked the edge, took off most of the waste by making short cuts with a dovetail saw and knocking them out with a chisel, then used a #3 plane to smooth and finish it.  Elapsed time, less than 10 minutes for the longest one.  (I judge time by songs;  the longest one to do took me all of "Drinking Duncan" and part of "Slip Slidin' Away", both by Paul Simon.  So maybe 7-8 minutes.)  Each of those three came out cleaner and faster than the one with the jig.

Monday, March 10, 2014

Book Review 4: "The Anarchist's Tool Chest", by Christopher Schwarz

I have to admit, I'm hesitant to write this review.  This book has generated massive amounts of controversy for some reason, and I'm not really sure why.  It seems like, for most people, it's a love-it-or-hate it kind of read.  I'm going to break that trend, and say that while I really like the book, there are things I don't like about it.  On a related note, this book was purchased before any of the books I've already reviewed.

The standard disclaimer:  I am not an expert.  I'm not even a journeyman.  I'm less of a beginner than I was when I wrote my last book review, but I'd still class myself as a beginner.

First Thoughts:

As you probably guessed from the title, this is a review of "The Anarchist's Toolchest", by Christopher Schwarz.  Overall, I like the book.  It's written well, and I happen to enjoy Mr. Schwarz's writing style.  Mixing the practical text with stories of how he got to that point makes this less of an instruction manual and more of a "here's how I got where I am today" narrative.

As a general rule, I like the discussion of tool types and the section about the chest.  I find the background stories to be mostly interesting, and good background on WHY Mr. Schwarz believes what he does.  Although there are places where I disagree with him, he mostly hasn't tried to set himself up as the One True Source, and agrees that there's room for disagreement on, say, whether wooden planes are better or worse than steel ones.

That said:  I really could have done without the philosophy.  I don't really agree with his labeling of himself as an anarchist, and I really would have preferred a few more pages of tools to the pages of sociopolitical monologuing.   It's not that it was badly written or offensive, I just don't think it added anything to the book.

Details:

I consider this book to contain four parts, although (except for part 4) they're all mixed together.

1) Background

This covers where Mr. Schwarz came from, what his experience is, and why you should (or shouldn't) pay attention to him.  While it's not strictly necessary, I found that it made sense of a lot of other things in the book that might not otherwise have been entirely clear.  This is where the book starts, and pieces of backstory are scattered throughout the rest of the book.

One thing I'll address here.  I've heard (or more accurately read) people saying that Mr. Schwarz "isn't really a woodworker", or that he's clearly a writer and not a craftsman, or something similar.  I think this is nonsense.  There are very few people who are full time woodworkers these days, and it's true, he's not one of them.  But then, the people who are mostly don't have time to write books.  That's just kind of how it goes.  But he's built a fair amount of furniture for his house, and he knows enough to teach classes;  as far as I'm concerned, that's real enough.

2) Philosophy

This is where the book loses me.  I don't argue that none of it is interesting -- I'd never heard of the Cincinnati Time Store before -- but I don't think it adds much to the book.  Some of the it, such as his discussion of why he prefers to use furniture he has made himself, is interesting.  Some of it, such as the discussion on what it means to be an Anarchist, feel out of place.  It sort of feels like he inserted a lot of this to justify his use of hand tools;  I feel like "I got interested in the history and decided I liked them" would have been an adequate justification.  That's really all I have to say about this section, except that while I don't like it, it doesn't leave the book unreadable;  it just means there are more pieces I skip on re-readings.

3) The Tools

This is, to me, the most interesting part of the book.  This is a list of the tools that Mr. Schwarz considers "essential";  the "if I have this, I can build almost any piece of furniture" list.  The list is based, for the most part, on historical records:  the tools listed in "The Joiner and Cabinet Maker", Josoph Moxon's writings, Andre Roubo's writings, and so on.  There are, of course, exceptions -- the block plane is too modern to have made it into any of those sources -- but that's the base.

What I most appreciate about this section is that there is some guidance on finding tools and rehabbing them.  Yes, the advice is sometimes "Don't bother, just buy a new one", but there are places where he says "Don't worry about this type of defect, here's how to fix it."  While he does highly recommend buying a lot of things from modern manufacturers, he also acknowledges that not everyone can drop $300 on a hand plane, and so buying an old one is likely and not a bad idea.

There are also a few tools in here -- winding sticks, a 2 or 3 foot straightedge, and so on -- that he advocates making for yourself.  The instructions are a little bit sparse, but should be enough for anyone but a raw beginner to manage.

4) The Chest

This is the part most people will buy the book for, but in all honestly I'll probably never use it.  The fact is, my shop space is tiny, and I can't afford to give up the floor space.  Instead, I build a Dutch-style chest, and I'm planning on a low cabinet to set it on top of. 

That aside, this section is fascinating.  It's a solid, step-by-step guide to building a traditional joiner's toolchest, and well worth it even if you're not planning to build one.  There's a lot of good general information on building boxes or any type of carcase, and a lot of tips on tool use that I have found useful in other projects.

There is also another subsection here, on use of the chest and design for tool chests generally.  While I haven't worked from one of these, I've tried some of the motions involved in retrieving things from the bottom.  It feels to me like it would probably work just fine, unless you have a particularly bad back.  I was also interested by Mr. Schwarz's take on dividers and French fitting:  he's fairly opposed to both.  Given that just about every other book on tool chests or tool storage is in favor of both, I found his logic interesting. 

Final Thoughts:

As I've said, I like the book.  I have a suspicion, though, that a lot of people will find the writing style to be annoying enough that it detracts from the value of the book for them.  Similarly, this is not a "do this to be a better woodworker" type of book.  You won't find (except in the chest-building section) clear "do this, then do this" steps.  But there are a lot of books that do that.  I've reviewed a couple of them.  What this book does is try to demonstrate that we've fallen into the trap of "more is better" when it comes to tools, and that "mass produced is better" when it comes to furniture.  I can agree with the basic concept, even if I don't entirely agree with how bad those things are.

This book did one critical thing for me.  It gave me a starting point.  I read the book just about the time I was starting to move my shop indoors, which meant giving up the majority of my power tools.  I knew I needed hand tools, but I didn't know which ones, or really how to pick them.  I'd bought a few, but I didn't really know what I was doing.  Between "The Anarchist's Toolchest" and "Woodworking 1 &2" (by Paul Sellers), I learned how to get started, and I learned that yes, there are other people doing this crazy thing I'm trying to do.  That last one alone made a huge difference.  It meant I knew I could go looking for modern sources for information about what I was doing, and not have to figure it all out for myself.

Would I recommend the book?  Yes.  In point of fact, it's currently one of my three main recommendations for people who want to start working with hand tools.  It's less process based than the other two, but the information on tools is far and away the best of the books I've read.