Showing posts with label toolchest. Show all posts

Wednesday, May 13, 2015

A Traveling Chest - early thoughts

I love my Dutch-style chest, but it's not actually very portable.  I mean, yes, I can lift and move it with some help, but it's not "toss it in the car the morning of a trip" portable.

So I've been thinking about it, and I've decided to make a pair of devices to solve the problem.  One, which I'll build later, is a "milkman's bench", from the plans in Popular Woodworking a while ago (June 2013, according to the internet).  The first project is a small tool chest.

I'm planning to base it on a Japanese toolbox design, with a few modifications.  There's a sample of the design here.  I've seen a few variations, and my intent is to borrow a few of them.  While the standard design has no dividers, I'm considering adding one, to separate saws from everything else.  I'm also planning to set up the top so that I can set it on a bench or tabletop and use it as a bench hook and shooting board;  that will probably necessitate replacing it periodically, but that's OK.  The idea is quick and inexpensive.  To be honest, I expect nails to cost more than everything else put together, since I'd like to do square nails, and clench them in some spots.

For tools, I'm going to try to figure out a really minimal set.  Here's what I'm thinking at the moment.


  1. Saws.  My Shark Ryoba should handle the majority of chores, being cross or rip cuts in more or less any wood.  I'm also planning on a coping saw, since curves aren't really practical with the Ryoba.  I'm torn on the Veritas Carcase Saw;  it's tremendously useful, but I'm not convinced it's worth the weight.
  2. Chisels.  I'm planning on 1/4, 1/2, and 1" chisels.  They should cover just about any need I have.  These will need a tool roll, but that's OK.
  3. A hammer and a mallet.  My mallet at the moment is a cheap Harbor Freight panel beating mallet, and it works great.  The hammer will drive nails, and the mallet will adjust planes, drive chisels, and knock things together when I'm doing glueups.
  4. Brace and bits.  I'm a little bit torn on this.  They add a LOT of weight, but they're really the best option for making holes bigger than about 1/4".  Probably they'll go in.
  5. Hand drill and bits.  This might end up being my full roll of bits, but more likely I'll buy a small box of common bits, and call it good.
  6. Gimlets.  They weigh practically nothing, and they're the best tool I've ever found for starting screws.  Done.
  7. Planes.  I think I'll have a #5, #3, and the wooden shoulder plane in my regular kit.  That covers stock removal, jointing, smoothing, and rabbets, which is most of what I'll need.  I'll likely also toss a Veritas medium router plane in, because there are some things you just can't easily do otherwise.
  8. My shop apron.  The pockets of the shop apron hold:  a tape measure, a six inch combination square, a marking knife, a mechanical pencil, a folding 12 rule, and a very small six inch rule, which is great for checking mortise depths and things like that.
  9. Odds and ends.  The finest plate from my DMT set, a block of paraffin wax, a strop, scrapers, and stuff like that.  Probably a 16" rule, but maybe not.  Likely a bottle each of hide glue and Titebond 3.  At least one marking gauge.  Maybe a spokeshave, but maybe not.  Certainly a four-way rasp/file.
The real question in my mind is how much this is all going to weigh.  I'll probably drop it all in a bag or a bucket before starting to build, in case I wind up needing to slim it down further.  I could probably replace the #3 plane with a coffin plane, which would leave me the value but drop the weight some.


So what do I expect to be able to do with this?  Basically anything.  The ryoba and chisels mean I can cut dovetails.  Adding the carcase saw would mean I can suddenly cut dados, open or stopped, and grooves, and clean them with the router plane, which can also do things like hinge or lock mortises  The shoulder plane can cut rabbets.  Between the brace, hand drill, and gimlets, I can put a hole of any size in pretty much any wood.  With the coping saw, chisels, and a rasp I should be able to make curves of almost any radius, either inside or outside.

Some things will be difficult.  I wouldn't want to make a raised panel with this set, or cut grooves in anything very large.  I'm considering ordering the Mujingfang plow plane:  If it's decent, I might keep it for this chest, as a light-weight option.  If I could manage to replace all of the planes with wood, that would lighten it up considerably, leaving the brace as the single heaviest item.

In any case, it should prove interesting!

Monday, March 10, 2014

Book Review 4: "The Anarchist's Tool Chest", by Christopher Schwarz

I have to admit, I'm hesitant to write this review.  This book has generated massive amounts of controversy for some reason, and I'm not really sure why.  It seems like, for most people, it's a love-it-or-hate it kind of read.  I'm going to break that trend, and say that while I really like the book, there are things I don't like about it.  On a related note, this book was purchased before any of the books I've already reviewed.

The standard disclaimer:  I am not an expert.  I'm not even a journeyman.  I'm less of a beginner than I was when I wrote my last book review, but I'd still class myself as a beginner.

First Thoughts:

As you probably guessed from the title, this is a review of "The Anarchist's Toolchest", by Christopher Schwarz.  Overall, I like the book.  It's written well, and I happen to enjoy Mr. Schwarz's writing style.  Mixing the practical text with stories of how he got to that point makes this less of an instruction manual and more of a "here's how I got where I am today" narrative.

As a general rule, I like the discussion of tool types and the section about the chest.  I find the background stories to be mostly interesting, and good background on WHY Mr. Schwarz believes what he does.  Although there are places where I disagree with him, he mostly hasn't tried to set himself up as the One True Source, and agrees that there's room for disagreement on, say, whether wooden planes are better or worse than steel ones.

That said:  I really could have done without the philosophy.  I don't really agree with his labeling of himself as an anarchist, and I really would have preferred a few more pages of tools to the pages of sociopolitical monologuing.   It's not that it was badly written or offensive, I just don't think it added anything to the book.

Details:

I consider this book to contain four parts, although (except for part 4) they're all mixed together.

1) Background

This covers where Mr. Schwarz came from, what his experience is, and why you should (or shouldn't) pay attention to him.  While it's not strictly necessary, I found that it made sense of a lot of other things in the book that might not otherwise have been entirely clear.  This is where the book starts, and pieces of backstory are scattered throughout the rest of the book.

One thing I'll address here.  I've heard (or more accurately read) people saying that Mr. Schwarz "isn't really a woodworker", or that he's clearly a writer and not a craftsman, or something similar.  I think this is nonsense.  There are very few people who are full time woodworkers these days, and it's true, he's not one of them.  But then, the people who are mostly don't have time to write books.  That's just kind of how it goes.  But he's built a fair amount of furniture for his house, and he knows enough to teach classes;  as far as I'm concerned, that's real enough.

2) Philosophy

This is where the book loses me.  I don't argue that none of it is interesting -- I'd never heard of the Cincinnati Time Store before -- but I don't think it adds much to the book.  Some of the it, such as his discussion of why he prefers to use furniture he has made himself, is interesting.  Some of it, such as the discussion on what it means to be an Anarchist, feel out of place.  It sort of feels like he inserted a lot of this to justify his use of hand tools;  I feel like "I got interested in the history and decided I liked them" would have been an adequate justification.  That's really all I have to say about this section, except that while I don't like it, it doesn't leave the book unreadable;  it just means there are more pieces I skip on re-readings.

3) The Tools

This is, to me, the most interesting part of the book.  This is a list of the tools that Mr. Schwarz considers "essential";  the "if I have this, I can build almost any piece of furniture" list.  The list is based, for the most part, on historical records:  the tools listed in "The Joiner and Cabinet Maker", Josoph Moxon's writings, Andre Roubo's writings, and so on.  There are, of course, exceptions -- the block plane is too modern to have made it into any of those sources -- but that's the base.

What I most appreciate about this section is that there is some guidance on finding tools and rehabbing them.  Yes, the advice is sometimes "Don't bother, just buy a new one", but there are places where he says "Don't worry about this type of defect, here's how to fix it."  While he does highly recommend buying a lot of things from modern manufacturers, he also acknowledges that not everyone can drop $300 on a hand plane, and so buying an old one is likely and not a bad idea.

There are also a few tools in here -- winding sticks, a 2 or 3 foot straightedge, and so on -- that he advocates making for yourself.  The instructions are a little bit sparse, but should be enough for anyone but a raw beginner to manage.

4) The Chest

This is the part most people will buy the book for, but in all honestly I'll probably never use it.  The fact is, my shop space is tiny, and I can't afford to give up the floor space.  Instead, I build a Dutch-style chest, and I'm planning on a low cabinet to set it on top of. 

That aside, this section is fascinating.  It's a solid, step-by-step guide to building a traditional joiner's toolchest, and well worth it even if you're not planning to build one.  There's a lot of good general information on building boxes or any type of carcase, and a lot of tips on tool use that I have found useful in other projects.

There is also another subsection here, on use of the chest and design for tool chests generally.  While I haven't worked from one of these, I've tried some of the motions involved in retrieving things from the bottom.  It feels to me like it would probably work just fine, unless you have a particularly bad back.  I was also interested by Mr. Schwarz's take on dividers and French fitting:  he's fairly opposed to both.  Given that just about every other book on tool chests or tool storage is in favor of both, I found his logic interesting. 

Final Thoughts:

As I've said, I like the book.  I have a suspicion, though, that a lot of people will find the writing style to be annoying enough that it detracts from the value of the book for them.  Similarly, this is not a "do this to be a better woodworker" type of book.  You won't find (except in the chest-building section) clear "do this, then do this" steps.  But there are a lot of books that do that.  I've reviewed a couple of them.  What this book does is try to demonstrate that we've fallen into the trap of "more is better" when it comes to tools, and that "mass produced is better" when it comes to furniture.  I can agree with the basic concept, even if I don't entirely agree with how bad those things are.

This book did one critical thing for me.  It gave me a starting point.  I read the book just about the time I was starting to move my shop indoors, which meant giving up the majority of my power tools.  I knew I needed hand tools, but I didn't know which ones, or really how to pick them.  I'd bought a few, but I didn't really know what I was doing.  Between "The Anarchist's Toolchest" and "Woodworking 1 &2" (by Paul Sellers), I learned how to get started, and I learned that yes, there are other people doing this crazy thing I'm trying to do.  That last one alone made a huge difference.  It meant I knew I could go looking for modern sources for information about what I was doing, and not have to figure it all out for myself.

Would I recommend the book?  Yes.  In point of fact, it's currently one of my three main recommendations for people who want to start working with hand tools.  It's less process based than the other two, but the information on tools is far and away the best of the books I've read.

Wednesday, October 30, 2013

Dutch Toolchest project - not quite done!

Just for once, I decided to do what all the cool kids are doing, and built myself a Dutch Toolchest.  It's kind of neat to be part of a crowd.  The project isn't quite done, but it's done enough to photograph.

I imagine anyone who finds this post will have already seen more than they want to know about the chest, so I'll just include this link to Christopher Schwarz's article about them.

I made a few changes, some of which may cause trouble in the future, and some of which are already causing trouble.

Construction:
The construction is standard:  I had a lot of 1x12 pine lying around after tearing up a workbench that was left behind by the previous owners of my house, so I used that.  So far I've managed to avoid buying any parts at all for this chest, and I'm hoping to keep it that way.  The shelves are set into dados in the sides, and the front and back are simply screwed on.  In the near future I'll add a chain or cloth tape to hold the lid open, but for now it just leans on whatever I've put behind the chest.  The boards for the back are shiplapped, since I didn't have a good set of irons for doing tongue and groove.  And now, on to the photos!  (click any of them to get a full sized image on Flickr)

Click here to see full size on Flickr


The Top Compartment:


Click here to see original on Flickr

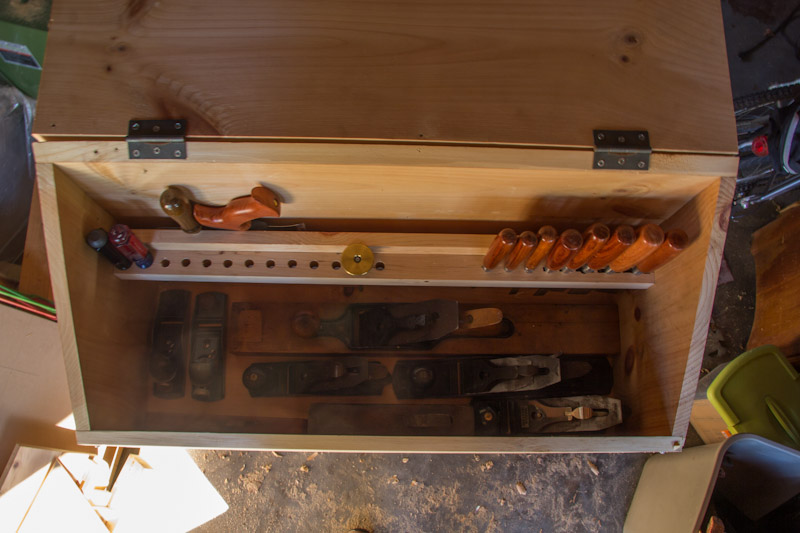
As you can see, there's a LOT of space in there.  In this photo, it's holding:
  • 8 Chisels, ranging from 1/4" to 1 1/2".
  • 2 Screwdrivers;  one is a standard size flat-head, the other is a 4-in-1 type.  I'll be adding more screwdrivers later. 
  • A wheel-type marking gauge.
  • 2 Joinery saws, a gent's type dovetailing saw and a Veritas carcase saw.  I'm planning to add a 14" tenon saw to that eventually, but for now these do what I need.
  • Planes!  Fitted in the bottom of the compartment are:
    • A 24" transitional Siegley try plane.
    • A Stanley #5 jack plane
    • A Ward's Master #4 smoothing plane
    • A Stanley #3 smoothing plane (I use this more than the #4 these days)
    • Two block planes, one Stanley and the other Craftsman, both regular angle.
    • A 2" skew rebate plane
    • A 1" straight rebate plane.
  • Not present in the photo is my shop apron, which gets folded and set on top of the planes.
There's a stretch of open space next to the chisels, which I'll drill as necessary to hold other tools.  I'd like to add some mortising chisels to my tool kit, and I'll probably need to drill odd-sized holes for those, and my Yankee screwdriver will also need a much larger hole than the rest of my screwdrivers.

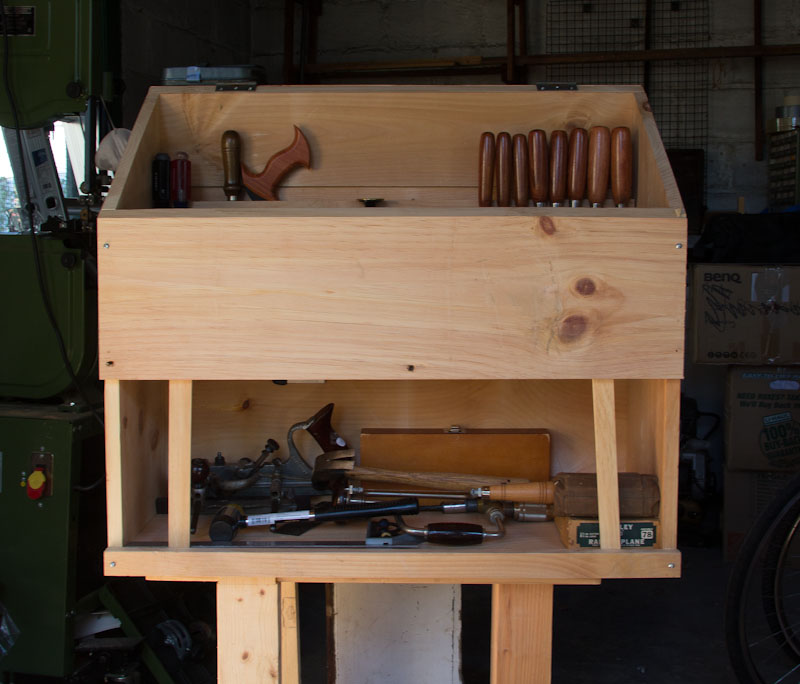
You can see I made one major change from the original chest here:  I added a false back to mount the tool rack on, and store joinery saws behind the false back.  Once I've worked out where I want them, I'll slide thin partitions down between the saws and tack them in place.  That should give the teeth more protection than they have in the Schwarz version, and give me an easy way to re-adjust what saws are where.

The Bottom Compartment:


Click here to see original on Flickr


The lower compartment is a lot messier, and I'm hoping to change that.  I'm starting to think I may want to add a drawer or two to hold small tools:  a stack at one end would hold drill bits, my #78, and parts for the combination plane quite nicely, with plenty of space left for everything else.

In the photo, you can see:
  • A Sargent made combination plane, and a roll of irons for it
  • A Stanley #78 moving fillister plane
  • A box of Forstner bits
  • A hammer and a plastic mallet
  • A brace
  • A 16" combination square
  • The tip of the carcase saw from the top.
 I'll be adding at least one more brace, a roll of auger and other bits, and an eggbeater drill.  That might be all that needs to fit, but I'm not sure.

What's left?

Since the title of this post indicates that there's some work left to do, I might as well mention that.

The first thing that remains to be done is adding a way to mount panel saws inside the lid.  The fact that I moved the tool rack forward means I don't have space to mount them the same way Christopher Schwarz did, with two saws stacked together.  Most likely what I'll do is add brackets that hold both saws flat against the lid.  If there's space, I'd also like to put that 16" combination square there, but I'm not going to count on it being possible.  As part of this, I need to remove the lid and create mortises for the hinges to sit in.

The second thing is building a drop panel for the front.  My intent has been to set that up the way everyone else does, with a simple latching mechanism and a removable panel.  I'm now thinking I might want to do something a little different, and hinge it so it stays attached.  That would let me pull things out and use the front panel as a small surface to, for instance, unpack the #78 and put it together.

Possibly before that, but certainly before finishing, I need to get some handles on this chest.  It weighs quite a lot, and right now it's basically impossible to lift without removing at least some of the planes.  Right now I'm thinking to use 1 1/2" square strips across both sides, with a hollow on the underside to get my fingers into.  I'd love to use quality iron lifts, but I'm still trying to make this work without buying any parts, and I don't have any lifts handy.

Finally, I want to paint the chest.  I have a few small tester-size cans of a dark blue paint, which I'll use after an oil-based primer.  The wood I used is fairly dirty, and I'd like that to not stain through the paint.