Someone on WoodworkingTalk.com asked recently what limitations there were on what could be done with hand tools. I started writing with the intention of just saying "There are none, everything used to be done that way." I wound up with something long enough that I've decided to put it here, as well.
I started out down the power tool route, then did a 170 (not quite a 180
-- I still use a few power tools) after seeing a presentation by Paul
Sellers and some videos of a few other hand tool workers. I said I use a
few power tools, still: they are a corded electric drill, a drill
press, a band saw, and a circular saw. I've also got a chop saw, but
it's really a rough carpentry tool... I could spend a month calibrating
it, and I still don't think it would cut a perfect 90 degree angle. If I
were starting over I wouldn't buy the handheld drill or the circular
saw, so I'm leaving them out of my math. Here's my take.
Anything you could make with power tools, you could also make with hand
tools. Anything you could make with hand tools, you could also make
with power tools. The question of "Can it be done?" is therefore pretty
meaningless. So what's the difference? Cost, convenience, and
complexity.
Cost: Hand tools are arguably cheaper. I'm pretty sure I'm less than
$800 into my hand tool kit, and the only things left that I know I'll
need sooner or later are a pair of router planes and some new drill and
auger bits. I'm including the two power tools I anticipate using
regularly in that number, by the way -- a band saw and a drill press.
I'll probably buy the planes and bits new, which means I'll probably add
another $300-350 to my total. If you buy all new, instead of mostly
cheap and used like I have, you can still probably get a good kit for
under a grand, just slightly less complete. On the other hand, a nice
solid table saw can run upwards of $500 on its own, and you'll still
need a router, router table, bandsaw, drill press, miter saw, and so on.
I priced it out. Buying good quality new tools, or even high quality
used tools, gets expensive.
Convenience: In many cases, power tools are more convenient. I have a
band saw for doing long rip cuts, long curves, and resawing. I have a
drill press for drilling perfectly aligned holes of any size. In other
cases, hand tools are more convenient. I don't know of a way to come up
with the same end-grain surface that a hand plane used with a shooting
board will get. For cutting a small board to exact length, I'd rather
use a carcasse saw and a bench hook than a miter saw: it's faster, more
accurate, and less prone to throwing little bits of wood around the
shop like buckshot. And in just about every case, the hand tool will be
quieter and cleaner, which is a nice bonus.
Complexity: In my mind, this almost always goes in favor of hand tools.
Complex compound miters are relatively easy with hand tools: draw the
line you want to cut on, put the piece of wood in a vise, and cut it.
With power tools, you frequently end up needing complex jigs to do the
same job. Given the need to cut a piece to an exact length, I can
measure it out on the piece, mark it, and cut. I find that a lot easier
than setting up a table or miter saw. Most operations, though, aren't
any less complex either way: cutting curves with a bow saw or a band
saw are the same except in terms of effort. Ripping is simple with hand
or power tools, it's just more work with hand tools. There's one
specific place this goes entirely in favor of power tools: production
line work. If I need a hundred boards cut to the same length, I'd far,
FAR rather use a miter saw with a stop block than a hand saw. It's
faster, it's easier, and it's simpler. No question. If I need to
produce a huge run of identical molding, a router or shaper is the
simpler answer by far. There's really no room for debate, it's just
true.
So. What does all that mean? It means I value quiet and simple more
than I value fast and physically undemanding. I like being able to
listen to the radio while working, and I don't mind that woodworking
makes me sweat. (I need the exercise anyway.) I also, so far, have
built small one-of-a-kind things; if I wanted to make a run of ten
identical dining room chairs, or anything else for that matter, I might
well re-consider. You might find the value equation goes the other way.
I really couldn't tell you. But I can state that anything you can do
with one type (power or non-powered) of tool, you can also do with the
other type. It just may take more work.
Saturday, January 25, 2014

Saturday, January 4, 2014
Remembering to check the simple things
I've been meaning to write this post for a while -- started it several weeks ago, in fact -- but life keeps getting in the way.
One of the first things I built that was useful was a bench hook. It's a simple device: a piece of 1x8 scrap, with some scrap 1 1/2" square cedar for a fence and the hook. It's always been pretty good as a bench hook, but this summer I started using it as a shooting board.
And it worked OK, except boards were never quite square. So I fiddled with it. I checked the base for square: it was fine. I made sure the fence was square: it wasn't, but I fixed that. I checked to make sure the top of my bench was really flat, and that THAT wasn't throwing things off. Nothing worked.
Finally, one day, driven to the point of distraction by this oddity (the plane was cutting nice shavings, it just wasn't leaving the edge of the workpiece square to the faces), I realized there was one thing I hadn't checked. So I checked it. And, as you've probably already guessed by now, my PLANE isn't square. In fact, the side of my nice old #5 isn't even flat. The thing rocks, somewhat at random, which is why I couldn't get a consistent cut.
It's not worth replacing the plane for, and I didn't feel like trying to flatten it, but at least now I know, and I can make allowances. Or just use a plane that IS square.
So remember: if your jig doesn't work right, the problem might not be the jig.
One of the first things I built that was useful was a bench hook. It's a simple device: a piece of 1x8 scrap, with some scrap 1 1/2" square cedar for a fence and the hook. It's always been pretty good as a bench hook, but this summer I started using it as a shooting board.
And it worked OK, except boards were never quite square. So I fiddled with it. I checked the base for square: it was fine. I made sure the fence was square: it wasn't, but I fixed that. I checked to make sure the top of my bench was really flat, and that THAT wasn't throwing things off. Nothing worked.
Finally, one day, driven to the point of distraction by this oddity (the plane was cutting nice shavings, it just wasn't leaving the edge of the workpiece square to the faces), I realized there was one thing I hadn't checked. So I checked it. And, as you've probably already guessed by now, my PLANE isn't square. In fact, the side of my nice old #5 isn't even flat. The thing rocks, somewhat at random, which is why I couldn't get a consistent cut.
It's not worth replacing the plane for, and I didn't feel like trying to flatten it, but at least now I know, and I can make allowances. Or just use a plane that IS square.
So remember: if your jig doesn't work right, the problem might not be the jig.
Tuesday, November 5, 2013
CTR 8: Veritas Carcase Saw
This is a review of the Veritas 12TPI Carcase Saw. Mine is filed rip, which seems to work fine for everything I've used it for.
As with the DMT sharpening plates, I'm a little hesitant to call this a "Cheap Tool Review". The saw cost me about $80, which isn't cheap, especially not compared to, say, the gent's saw I reviewed a while back. On the other hand, an equivalent tool from Lie Nielsen equivalent is about $140, and the prices mostly go up from there.
First and foremost, I'm convinced it doesn't actually matter at this tooth size. There seems to be some agreement among hand-tool gurus that that's the case, and my experience with this saw seems to back it up. Simply put, with teeth this small you'll get a relatively smooth cut no matter what the tooth geometry is. Cross cutting is always easy even with rip teeth, and ripping always sucks with crosscut teeth. So, if you're only going to get one saw in a size, and the size includes small (12 or more teeth per inch) teeth, just buy it filed for ripping.
A lot of what I want this for is ripping. Cutting tenons, ripping very small stock, starting rip cuts on longer (thin) stock to continue with my ryoba, and things like that. Any crosscutting I do will be small; tenon shoulders, or cutting small pieces to length on a bench hook.
I've used it so far for both ripping and cross-cutting pine, maple, and poplar: it had no trouble with anything. It cuts straight unless I screw it up, and the cut is clean and fairly smooth, with very little tearout on the back. My one complaint is that it's hard to start, and I think that will fade as I learn to use the saw better.
UPDATE, 16 June 2014: I've come to dislike how thin the blade is. I know, I know, it's supposed to make things easier, but I'd really prefer it just a touch thicker. I now have an old Disston tenon saw to compare it to, and I really like the thicker blade on the Disston. I still like it otherwise, and that's certainly a personal preference, so I still recommend the saw.
As with the DMT sharpening plates, I'm a little hesitant to call this a "Cheap Tool Review". The saw cost me about $80, which isn't cheap, especially not compared to, say, the gent's saw I reviewed a while back. On the other hand, an equivalent tool from Lie Nielsen equivalent is about $140, and the prices mostly go up from there.
Where, and How Much?
I purchased the saw from Woodcraft, and paid about $80.What do you get, and What's the Construction Like?
You get a saw, and not much else, unless you count the rather nice cardboard box. I don't. The construction is up to the normal Veritas standards: the handle is well-formed and comfortable to hold, made out of a good hardwood (currently Bubinga, although I can imagine them changing it if the supply gets low). The teeth are well cut and even, and the set is just about perfect. I'm not a big fan of the resin spine -- I think brass or steel would look better -- but it feels solid, and being able to mold the spine probably cuts some off the price. Overall, it feels very well made, and it's comfortable to use.How does it work?
It works great. I bought the 12TPI saw, filed for ripping. Why? Well, for a few reasons.First and foremost, I'm convinced it doesn't actually matter at this tooth size. There seems to be some agreement among hand-tool gurus that that's the case, and my experience with this saw seems to back it up. Simply put, with teeth this small you'll get a relatively smooth cut no matter what the tooth geometry is. Cross cutting is always easy even with rip teeth, and ripping always sucks with crosscut teeth. So, if you're only going to get one saw in a size, and the size includes small (12 or more teeth per inch) teeth, just buy it filed for ripping.
A lot of what I want this for is ripping. Cutting tenons, ripping very small stock, starting rip cuts on longer (thin) stock to continue with my ryoba, and things like that. Any crosscutting I do will be small; tenon shoulders, or cutting small pieces to length on a bench hook.
I've used it so far for both ripping and cross-cutting pine, maple, and poplar: it had no trouble with anything. It cuts straight unless I screw it up, and the cut is clean and fairly smooth, with very little tearout on the back. My one complaint is that it's hard to start, and I think that will fade as I learn to use the saw better.
Final Thoughts?
While it's not precisely cheap, this is an excellent saw for the price. I like the feel of the handle a lot, and while I don't exactly find it attractive, it works extremely well.UPDATE, 16 June 2014: I've come to dislike how thin the blade is. I know, I know, it's supposed to make things easier, but I'd really prefer it just a touch thicker. I now have an old Disston tenon saw to compare it to, and I really like the thicker blade on the Disston. I still like it otherwise, and that's certainly a personal preference, so I still recommend the saw.
Would I buy another?
Absolutely, but only if I manage to break this one. I really can't see myself having a need for a second saw just like this. If I decided to buy a dovetail saw, I'd seriously consider the one matching this saw. Sadly, they don't make a larger saw; I'd really like a saw roughly 14" long, with at least 4" of depth and around 12 teeth per inch, but those are hard to find.Wednesday, October 30, 2013
Dutch Toolchest project - not quite done!
Just for once, I decided to do what all the cool kids are doing, and built myself a Dutch Toolchest. It's kind of neat to be part of a crowd. The project isn't quite done, but it's done enough to photograph.
I imagine anyone who finds this post will have already seen more than they want to know about the chest, so I'll just include this link to Christopher Schwarz's article about them.
I made a few changes, some of which may cause trouble in the future, and some of which are already causing trouble.
Construction:
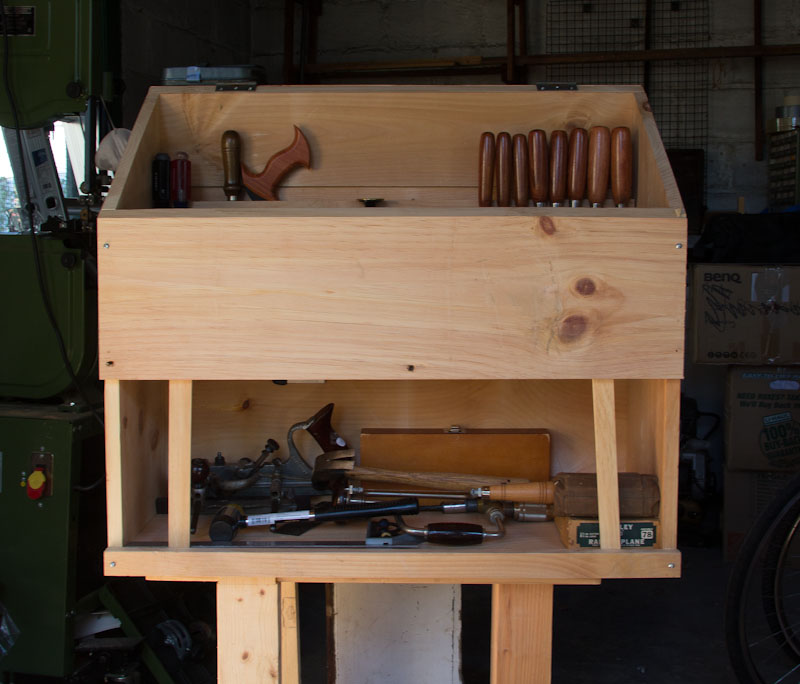
The construction is standard: I had a lot of 1x12 pine lying around after tearing up a workbench that was left behind by the previous owners of my house, so I used that. So far I've managed to avoid buying any parts at all for this chest, and I'm hoping to keep it that way. The shelves are set into dados in the sides, and the front and back are simply screwed on. In the near future I'll add a chain or cloth tape to hold the lid open, but for now it just leans on whatever I've put behind the chest. The boards for the back are shiplapped, since I didn't have a good set of irons for doing tongue and groove. And now, on to the photos! (click any of them to get a full sized image on Flickr)
The Top Compartment:
As you can see, there's a LOT of space in there. In this photo, it's holding:
You can see I made one major change from the original chest here: I added a false back to mount the tool rack on, and store joinery saws behind the false back. Once I've worked out where I want them, I'll slide thin partitions down between the saws and tack them in place. That should give the teeth more protection than they have in the Schwarz version, and give me an easy way to re-adjust what saws are where.
The Bottom Compartment:
The lower compartment is a lot messier, and I'm hoping to change that. I'm starting to think I may want to add a drawer or two to hold small tools: a stack at one end would hold drill bits, my #78, and parts for the combination plane quite nicely, with plenty of space left for everything else.
In the photo, you can see:
What's left?
Since the title of this post indicates that there's some work left to do, I might as well mention that.
The first thing that remains to be done is adding a way to mount panel saws inside the lid. The fact that I moved the tool rack forward means I don't have space to mount them the same way Christopher Schwarz did, with two saws stacked together. Most likely what I'll do is add brackets that hold both saws flat against the lid. If there's space, I'd also like to put that 16" combination square there, but I'm not going to count on it being possible. As part of this, I need to remove the lid and create mortises for the hinges to sit in.
The second thing is building a drop panel for the front. My intent has been to set that up the way everyone else does, with a simple latching mechanism and a removable panel. I'm now thinking I might want to do something a little different, and hinge it so it stays attached. That would let me pull things out and use the front panel as a small surface to, for instance, unpack the #78 and put it together.
Possibly before that, but certainly before finishing, I need to get some handles on this chest. It weighs quite a lot, and right now it's basically impossible to lift without removing at least some of the planes. Right now I'm thinking to use 1 1/2" square strips across both sides, with a hollow on the underside to get my fingers into. I'd love to use quality iron lifts, but I'm still trying to make this work without buying any parts, and I don't have any lifts handy.
Finally, I want to paint the chest. I have a few small tester-size cans of a dark blue paint, which I'll use after an oil-based primer. The wood I used is fairly dirty, and I'd like that to not stain through the paint.
I imagine anyone who finds this post will have already seen more than they want to know about the chest, so I'll just include this link to Christopher Schwarz's article about them.
I made a few changes, some of which may cause trouble in the future, and some of which are already causing trouble.
Construction:
The construction is standard: I had a lot of 1x12 pine lying around after tearing up a workbench that was left behind by the previous owners of my house, so I used that. So far I've managed to avoid buying any parts at all for this chest, and I'm hoping to keep it that way. The shelves are set into dados in the sides, and the front and back are simply screwed on. In the near future I'll add a chain or cloth tape to hold the lid open, but for now it just leans on whatever I've put behind the chest. The boards for the back are shiplapped, since I didn't have a good set of irons for doing tongue and groove. And now, on to the photos! (click any of them to get a full sized image on Flickr)
 | |
| Click here to see full size on Flickr |
The Top Compartment:
 | |
| Click here to see original on Flickr |
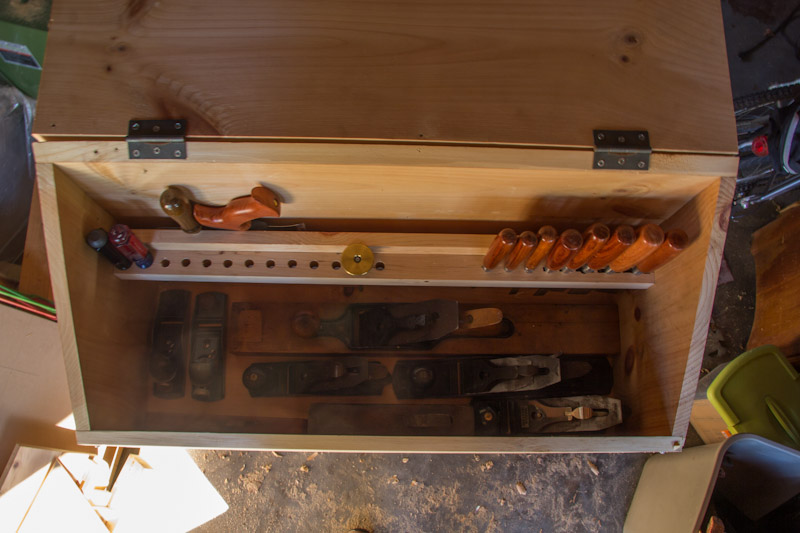
As you can see, there's a LOT of space in there. In this photo, it's holding:
- 8 Chisels, ranging from 1/4" to 1 1/2".
- 2 Screwdrivers; one is a standard size flat-head, the other is a 4-in-1 type. I'll be adding more screwdrivers later.
- A wheel-type marking gauge.
- 2 Joinery saws, a gent's type dovetailing saw and a Veritas carcase saw. I'm planning to add a 14" tenon saw to that eventually, but for now these do what I need.
- Planes! Fitted in the bottom of the compartment are:
- A 24" transitional Siegley try plane.
- A Stanley #5 jack plane
- A Ward's Master #4 smoothing plane
- A Stanley #3 smoothing plane (I use this more than the #4 these days)
- Two block planes, one Stanley and the other Craftsman, both regular angle.
- A 2" skew rebate plane
- A 1" straight rebate plane.
- Not present in the photo is my shop apron, which gets folded and set on top of the planes.
You can see I made one major change from the original chest here: I added a false back to mount the tool rack on, and store joinery saws behind the false back. Once I've worked out where I want them, I'll slide thin partitions down between the saws and tack them in place. That should give the teeth more protection than they have in the Schwarz version, and give me an easy way to re-adjust what saws are where.
The Bottom Compartment:
 | |
| Click here to see original on Flickr |
The lower compartment is a lot messier, and I'm hoping to change that. I'm starting to think I may want to add a drawer or two to hold small tools: a stack at one end would hold drill bits, my #78, and parts for the combination plane quite nicely, with plenty of space left for everything else.
In the photo, you can see:
- A Sargent made combination plane, and a roll of irons for it
- A Stanley #78 moving fillister plane
- A box of Forstner bits
- A hammer and a plastic mallet
- A brace
- A 16" combination square
- The tip of the carcase saw from the top.
What's left?
Since the title of this post indicates that there's some work left to do, I might as well mention that.
The first thing that remains to be done is adding a way to mount panel saws inside the lid. The fact that I moved the tool rack forward means I don't have space to mount them the same way Christopher Schwarz did, with two saws stacked together. Most likely what I'll do is add brackets that hold both saws flat against the lid. If there's space, I'd also like to put that 16" combination square there, but I'm not going to count on it being possible. As part of this, I need to remove the lid and create mortises for the hinges to sit in.
The second thing is building a drop panel for the front. My intent has been to set that up the way everyone else does, with a simple latching mechanism and a removable panel. I'm now thinking I might want to do something a little different, and hinge it so it stays attached. That would let me pull things out and use the front panel as a small surface to, for instance, unpack the #78 and put it together.
Possibly before that, but certainly before finishing, I need to get some handles on this chest. It weighs quite a lot, and right now it's basically impossible to lift without removing at least some of the planes. Right now I'm thinking to use 1 1/2" square strips across both sides, with a hollow on the underside to get my fingers into. I'd love to use quality iron lifts, but I'm still trying to make this work without buying any parts, and I don't have any lifts handy.
Finally, I want to paint the chest. I have a few small tester-size cans of a dark blue paint, which I'll use after an oil-based primer. The wood I used is fairly dirty, and I'd like that to not stain through the paint.
Wednesday, October 23, 2013
Current projects
I haven't written much here in a while, because life has been crazy. I'm working again, which is great, but leaves me with very limited shop time. Add in the fact that I keep scheduling my weekends for travel, and I have even less.
That said, I've made some progress. I'm just about done with construction of my all-scrap Dutch tool chest: it was made from the remains of a workbench which really wasn't useful to me (2x3 and 1x12 construction, and it wiggled when I pushed on it with one finger). I even managed to scrounge enough screws to do most of the assembly. I'll need to buy a few more screws, some hardwood for the lid-mounted saw rack, and one more board (probably) for the front panel, but it's basically done other than that.
So what's next? A new bench. The one I have is great: it's heavy, it's solid, and I like the way it looks. Unfortunately, it's in my unheated shop, where I won't be working for the rest of the year. So I'm going to build a new one. My intent is to make it portable: either folding, or just something I can dismantle.
Right now, I have two ideas.
1) The Roy Underhill "Woodwright's Apprentice" bench. I like the design, he claims it's stable, and removing a couple of screws lets the whole thing fold up. It'd be pretty cool to be able to fold up my bench and slide it and my toolbox into the back of my car.
2) The Paul Sellers bench. This would require some extra work: it's not really designed to be broken down, though just leaving the legs separate and wedging them in place or something would probably work. It wouldn't fold down into a single package, though. On the plus side, I've worked at one, and I quite liked it.
Either way I don't feel the need for a tail vise (I may install a wagon vise, if I can find a way to make it not stick out at all on the end), and I'm OK with a limited front vise: I'm actually considering just going with the frog design from the Underhill bench regardless of what else I do.
Regardless, it should be an interesting challenge.
That said, I've made some progress. I'm just about done with construction of my all-scrap Dutch tool chest: it was made from the remains of a workbench which really wasn't useful to me (2x3 and 1x12 construction, and it wiggled when I pushed on it with one finger). I even managed to scrounge enough screws to do most of the assembly. I'll need to buy a few more screws, some hardwood for the lid-mounted saw rack, and one more board (probably) for the front panel, but it's basically done other than that.
So what's next? A new bench. The one I have is great: it's heavy, it's solid, and I like the way it looks. Unfortunately, it's in my unheated shop, where I won't be working for the rest of the year. So I'm going to build a new one. My intent is to make it portable: either folding, or just something I can dismantle.
Right now, I have two ideas.
1) The Roy Underhill "Woodwright's Apprentice" bench. I like the design, he claims it's stable, and removing a couple of screws lets the whole thing fold up. It'd be pretty cool to be able to fold up my bench and slide it and my toolbox into the back of my car.
2) The Paul Sellers bench. This would require some extra work: it's not really designed to be broken down, though just leaving the legs separate and wedging them in place or something would probably work. It wouldn't fold down into a single package, though. On the plus side, I've worked at one, and I quite liked it.
Either way I don't feel the need for a tail vise (I may install a wagon vise, if I can find a way to make it not stick out at all on the end), and I'm OK with a limited front vise: I'm actually considering just going with the frog design from the Underhill bench regardless of what else I do.
Regardless, it should be an interesting challenge.
Tuesday, October 8, 2013
Extremely old tools: Rabbt plane restore
Last summer, my uncle found time to go through the basement of my grandparents' house. Since I'm the only woodworker in the family, he offered me all the possibly useful woodworking tools. Some of them were really just not useful (used up chisels, seriously heavy-duty metalworking vises, things like that), but there were a few nice things.
Among them was a box with a bunch of hand planes in it. Some of them were basically in new condition: the Stanley #3 needed to be sharpened and adjusted, but that was about it. The Stanley #78 may not ever have been actually used: some of the parts still had what appeared to be packing grease on them, and it was all in the original box.
Then there were a few much older planes. Among them were a coffin plane, which is in good shape except that the iron needs to be re-ground, and this.

It's a skew rabbet plane, in somewhat rough shape. It's wide, too: something like 2 or 2 1/2". The iron has been sharpened down to almost nothing (there might be as much as 3/4" remaining before it's too short to use, but I suspect it's more like 1/2"), and the bottom was actually rippled. I started out by getting the iron and wedge loose, which was quite a challenge. The iron had more or less rusted in place, and I wound up having to smack it pretty hard with a hammer to get it to move. Once it was out, I sanded it down. The good news was that it had been kept at the right grinding angle, so I didn't have to regrind from scratch, just get rid of the rust and then sharpen.
Here's a photo from partway through: you can see how much of the iron is gone.

I also touched up the wedge on sandpaper to get rid of the rust, but I did my best to avoid changing the shape at all.
Next up was dealing with the sole. This was the part I was worried about. I needed to remove something like a 1/8", which seemed impractical to do with sandpaper. I knew, though, that the sole was a little shorter than the sole of my #5, so it seemed likely that I just joint it. As it turned out, it worked fine; really old beech planes nicely, and I managed to get the sole at exactly 90 degrees to the left side. That should mean it will register correctly against the edge of a rabbet, and actually cut a square joint. In the process, though, I discovered something unpleasant.

Yep, those are cracks that run all the way from the toe to the heel. In the end, I decided to just leave it. Right now the plane can be used; it cuts smoothly, and feels solid. If I ever have some hide glue on hand I may rub some into the joint, but otherwise I'll simply use it until it breaks. At that point, I'll glue it back together and either keep using it or, more likely, retire it to a shelf as a reminder of my grandfather.
Among them was a box with a bunch of hand planes in it. Some of them were basically in new condition: the Stanley #3 needed to be sharpened and adjusted, but that was about it. The Stanley #78 may not ever have been actually used: some of the parts still had what appeared to be packing grease on them, and it was all in the original box.
Then there were a few much older planes. Among them were a coffin plane, which is in good shape except that the iron needs to be re-ground, and this.
It's a skew rabbet plane, in somewhat rough shape. It's wide, too: something like 2 or 2 1/2". The iron has been sharpened down to almost nothing (there might be as much as 3/4" remaining before it's too short to use, but I suspect it's more like 1/2"), and the bottom was actually rippled. I started out by getting the iron and wedge loose, which was quite a challenge. The iron had more or less rusted in place, and I wound up having to smack it pretty hard with a hammer to get it to move. Once it was out, I sanded it down. The good news was that it had been kept at the right grinding angle, so I didn't have to regrind from scratch, just get rid of the rust and then sharpen.
Here's a photo from partway through: you can see how much of the iron is gone.
I also touched up the wedge on sandpaper to get rid of the rust, but I did my best to avoid changing the shape at all.
Next up was dealing with the sole. This was the part I was worried about. I needed to remove something like a 1/8", which seemed impractical to do with sandpaper. I knew, though, that the sole was a little shorter than the sole of my #5, so it seemed likely that I just joint it. As it turned out, it worked fine; really old beech planes nicely, and I managed to get the sole at exactly 90 degrees to the left side. That should mean it will register correctly against the edge of a rabbet, and actually cut a square joint. In the process, though, I discovered something unpleasant.
Yep, those are cracks that run all the way from the toe to the heel. In the end, I decided to just leave it. Right now the plane can be used; it cuts smoothly, and feels solid. If I ever have some hide glue on hand I may rub some into the joint, but otherwise I'll simply use it until it breaks. At that point, I'll glue it back together and either keep using it or, more likely, retire it to a shelf as a reminder of my grandfather.
The downside to natural light
I love natural light. My shop, at the moment, is half of my detached two car garage (the other half is, at the moment, storage and motorcycle parking). That's fine: on good days I get a ton of light, and I've placed my bench directly in front of the doors, so working there is a pleasure.
The problem is that I only have natural light. See, there's not really any power to my garage. There's a single bulb lamp on the outside, and a single outlet inside. Neither one is grounded, and the wiring is left over from sometime probably in the 50s. Sooner or later I'll run new (three conductor) wire and install lights and a couple more outlets, but for now, I can't work at night, or when it's heavily overcast.
Oh well. At least I have a shop, and for most of the year it's a pleasure to work in. That's really the important part, after all.
The problem is that I only have natural light. See, there's not really any power to my garage. There's a single bulb lamp on the outside, and a single outlet inside. Neither one is grounded, and the wiring is left over from sometime probably in the 50s. Sooner or later I'll run new (three conductor) wire and install lights and a couple more outlets, but for now, I can't work at night, or when it's heavily overcast.
Oh well. At least I have a shop, and for most of the year it's a pleasure to work in. That's really the important part, after all.
Subscribe to:
Posts (Atom)