Tuesday, February 18, 2025

A new adventure

 While I haven't given up woodworking, it has fallen into the background for a while, and will probably continue to stay there.  Why?  Well, other hobbies have taken up my time.  I've done some travel, some photography, played a lot of tabletop war games, and now taken up weaving.  It has a lot of the same rewards for me that woodworking does, with the advantage that I can do it in the presentable areas of the house.

Of course, there's some overlap, especially given I've just purchased an old loom in need of repair, but that will be most of my craft time for a while.

If you're interested, I've started a new blog about it, and you can read the first entry here.

Friday, March 19, 2021

Some light reading

 I've seen a number of people ask recently what books they should look into if they're interested in woodworking, particularly without power tools.  I realized I'd never actually done a post on that, so here it is.

This is NOT a list of the best hand tool books out there.  I haven't read them all, and I may be missing something fantastic.  This is a list of some books I've found helpful, and some of why I thought they were worth recommending.  So, in no particular order:


- The Anarchist's Toolchest, by Christopher Schwarz.  This is an excellent book on theory and history, with excellent explanations of all the tools in an idealized English toolchest, and their use.  The toolchest is there, with full instructions, but isn't a great first project.  The rest of the trilogy, The Anarchist's Design Book and The Anarchist's Workbench, are also fantastic, and arguably more useful for a real beginner.

- Working Wood 1 & 2, by Paul Sellers.  This is a much better "getting started" book than the Anarchist trilogy.  It has a good section on tools, a number of starting projects with good explanation and photos, and an appendix on sharpening and tool care.  If I had to recommend just one book, it probably would end up being this one.

- The New Traditional Woodworker, by Jim Tolpin.  I've already reviewed this, here.  Since you already have that link, I'll just say it's a good book, and worth your time.

- The Essential Woodworker, by Robert Wearing.  This hasn't been one of my favorites, since I found the other three first.  That said, it's good enough that I'll recommend it.  It's now in print through Lost Art Press, and worth the purchase price.  It starts out very basic, then walks through building a few things, ranging from simple to complex.

- The Joiner and Cabinet Maker, by Anonymous, Christopher Schwarz and Joel Moskowitz.  This one is a little strange.  It started out as a short book in 1839, disappeared for quite a while, and was eventually found by Schwarz and Moskowitz.  The original book included discussion on how to get ahead in your trade, why you might be interested in woodworking, and basic operations.  It also included three projects:  a packing crate, a box for school books and lunch, and a chest of drawers.  Schwarz and Moskowitz added a preface on what the trades and trade unions in England looked like at the time, footnotes with explanation or expansion in the original text, and a section walking through actually building the projects in the book.  It's not exactly a how-to book, but there's a lot of good advice and explanation in it.  And, if nothing else, it's a good read!  (Also the audio book version was read by Roy Underhill, and although I haven't listened to it it's bound to be fantastic.)


So there you have it: my top choices for introductory woodworking books.  Give them a read, and let me know if you like them!

Wednesday, March 10, 2021

A minimal tool list

I've seen a lot of people recently asking what the minimal set of tools is, because they don't have a lot of money or space.  I've decided that that's probably something I'll be asked often enough that it's worth writing it up here.  This isn't exhaustive, and doesn't cover some of the weird tools you'll need for weird projects, but you should be able to make simple furniture with this list.  Be warned, I have a number of somewhat heretical opinions.

Measuring and Marking:

   - Pencils are useful.  Keep some handy.

   - Marking knife.  This doesn't need to be complicated or expensive.  It just has to have a relatively small blade (so it can fit into dovetails) and a sharp edge.  Don't over think it.

   - Small square:  I use a 6" Empire combination square for most things.  It fits in the pocket of my shop apron, which is nice.

   - Large square:  I mostly use a 16" Empire combination square.  If I'm working on something really big, I use either a framing square or a large wooden square I built.

   - Marking gauge.  Cheap, expensive, traditional wood, machined metal... you need something to make marks with.  I have a Veritas wheel marking gauge and a Harbor Freight mortise gauge.  Both work, and both get used. 


Cutting tools with teeth:  

   - If you're committed to a small kit, start with a ryoba (a Japanese style double sided pull saw).  With a little practice it's good for long rip cuts, any kind of cross cuts, and decent for dovetails.  You could stop there, but I don't recommend it.

   - Get a good fine tooth crosscut saw.  I use my Veritas carcass saw for almost everything, and it's enough nicer for things like dovetails that I'd add it to the Ryoba without a second thought.

   - I personally prefer Western saws:  I have a 5 1/2 TPI rip saw and a roughly 7TPI crosscut.  I used a ryoba for a long time, though, and I still use it occasionally.


Chisels:

   - Get decent chisels in 1/4", 3/4", and 1".  You'll want to expand later, but those will do most of what you want.  You can use regular bench chisels for cutting mortises, too, so you really can just stop there.


Whacking things.  You need two hammer-sort-of-things.

   - A thing for driving nails.  For furniture scale projects, I like a 12-oz hammer with a wooden handle.  Your preference my vary.

   - A thing for hitting chisels and making recalcitrant joints fit.  I recently switched from a mallet to a 2.5lb engineer's hammer, and I don't ever intend to go back.  Again, your preference may vary.


Hand Planes.  This is where preference really starts to come in.  These are my choices, and other people will disagree.  In order of importantance, and don't forget I'm a heretic:

   - A jointer/try plane.  Why?  Because store-bought lumber isn't straight.  You can smooth the surface with a sanding block or a palm sander, you can remove stock with a saw, but if you can't get the edge straight nothing else matters.

   - A smoothing plane.  I like a #3 or #4, depending on what I'm doing.  Get a #4 (or equivalent), learn to sharpen it, and use it.  If you want more later, go for it.

   - A jack plane.  I like a #5, which, oddly, seems to be the standard choice.  This is for removing stock, which you'll need to do eventually.

   - A rabbet plane.  #78, shoulder plane, straight rabbet, whatever:  you need a way to make rabbets, and this is the best quick, reliable method.

   - This is the weird one:  I think you need a plow plane, or some sort of equivalent.  You're going to want to cut grooves sooner or later, and a plow is the best way to do that.  I have several, and the cheap Mujingfang I got for $35 works OK.  I prefer a grooving plane if I have one in the right size, or a 45-equivalent if I don't.


Drills:

   - In all honesty, I'd start with a decent battery powered drill and a good set of bits.  I have a brace and bits, and an egg-beater drill, and they're fantastic, but I use an electric drill for almost everything.

   - Gimlets.  They're small, they're cheap, and they're the best tool I've ever found for drilling holes for screws.  Garret Wade has a decent set for a good price.


Sanding supplies:  Get an assortment of paper and a nice sanding block.  A powered sander is a nice thing to have too.


Sharpening supplies.  Here's where I just kind of have to wave my hands and say "good luck."  My personal preference is DMT Duosharp 3"x8" plates, plus a strop.  A lot of people prefer oilstones, sandpaper, or waterstones.  They're not wrong, and neither am I.  I also prefer sharpening without a jig, a preference I picked up from Paul Sellers at a presentation.  I do like a jig if I'm completely changing the bevel, though.  So... uh... good luck!


Other Stuff.

   - Glue.  I have a very strong preference for hide glue anywhere it's reasonable.  If it's for a kitchen or bath, I use Titebond 3.  For anything else, I go for Old Brown Glue.  Be aware that it has a limited shelf life, and buy it in smaller containers unless you know you've got a big project coming up.

   - Screws.  Buy them as you need them, but buy extra.  If you needed that size once, you're going to need it again.

   - Nails.  I'm a big fan of square nails from the Tremont Nail Co.  Again, buy them as you need them, and buy extra.


Big Stuff.

   - You're going to need a way to store your tools.  My choice is a "Dutch" tool chest.  I store everything on this list but the nails and screws, plus quite a lot more, in mine, and there's room to spare.  Make it to fit your tools:  mine is about 32" long because that's what I needed to fit my longest saw.  It's around 30" high at the highest, I think, and made from 1x12, so it's about 12.5" deep counting the front and back panels.

   - A bench is important.  You can look at the one I posted here, but there are endless good designs.  Make sure it has a good vise on the front, and holes for holdfasts.


Expensive (or rare) stuff.  These are some of the "nice to have" tools that are in my shop.

   - Hollow chisel mortiser.  Good LORD did this make my life easier.

   - Match planes.  These are a pair of planes designed to cut a matched tongue and groove, and they're the best hand tools every made.  I use mine for cutting grooves for drawer bottoms, too.  Honestly, these are probably higher on my list than the mortiser.

   - Band Saw.  Being able to easily cut curves is nice.  So is being able to make (mostly) straight cuts to rip a very narrow piece off.

   - Drill press.  Another one that's nice to have.  This is the first big power tool I had, and probably the least valuable to me.  It is pretty nice to have, though.


Books.  There are a vast number of woodworking books.  Here are a few I think are pretty good, in random order.

   - "Working Wood 1&2", Paul Sellers.  Watch his videos, too!

   - The "Anarchist" series from Christopher Schwarz.  "The Anarchist's Toolchest" is the first, and probably the most useful.

   - "The New Traditional Woodworker," by Jim Tolpin.

Thursday, February 16, 2017

Workshop Maintenance

I've spent some evenings and weekends working on a toddler bed frame for some friends recently (post to follow, sooner or later), and reached a point where I need to wait for someone else to finish their part.  This past weekend I built an English layout square, mostly for practice:  it's got legs somewhere around 22" long, which is bigger than is really useful in my tiny shop.  I hope to post an article about that either tomorrow or Monday.

But once that was done, I looked around and realized I'd been neglecting my tools recently.  Oh, I do a quick touchup with a strop while I'm working, but a few of my planes weren't cutting well anymore.  Last night I started working on getting everything back into top shape.  A lot of people seem to dislike sharpening, which I can understand:  it's a lot of time and effort that could otherwise be spent working on wood.  I still enjoy it, though, because every time I sharpen my tools, I get a better edge than I did the time before.

Last night I went over the cutters for my #3, #4, #5, and one of my block planes.  The block plane is low angle, and was a particular triumph, since it never cut right to begin with.  I finally got out some coarse sandpaper and and a honing jig, and re-ground the bevel.  Finally, it works well enough to get a good cut across end grain.

Next up are chisels:   none of them are as sharp as they could be, and a few of them I've never actually sharpened, since I haven't needed something that width.  Once those are done, I may tackle my dovetail saw:  it's gotten dull enough that I don't really use it, which means it's time to fix it up.

Tuesday, December 13, 2016

Workbench Modifications

I haven't been writing much, because I've been occupied on other things, like a piece of furniture I'm making for a friend.  Unfortunately, I screwed that up completely, and can't work on it again until I get more lumber.

On the plus side, that means I can spend some time working in the shop on my projects again!

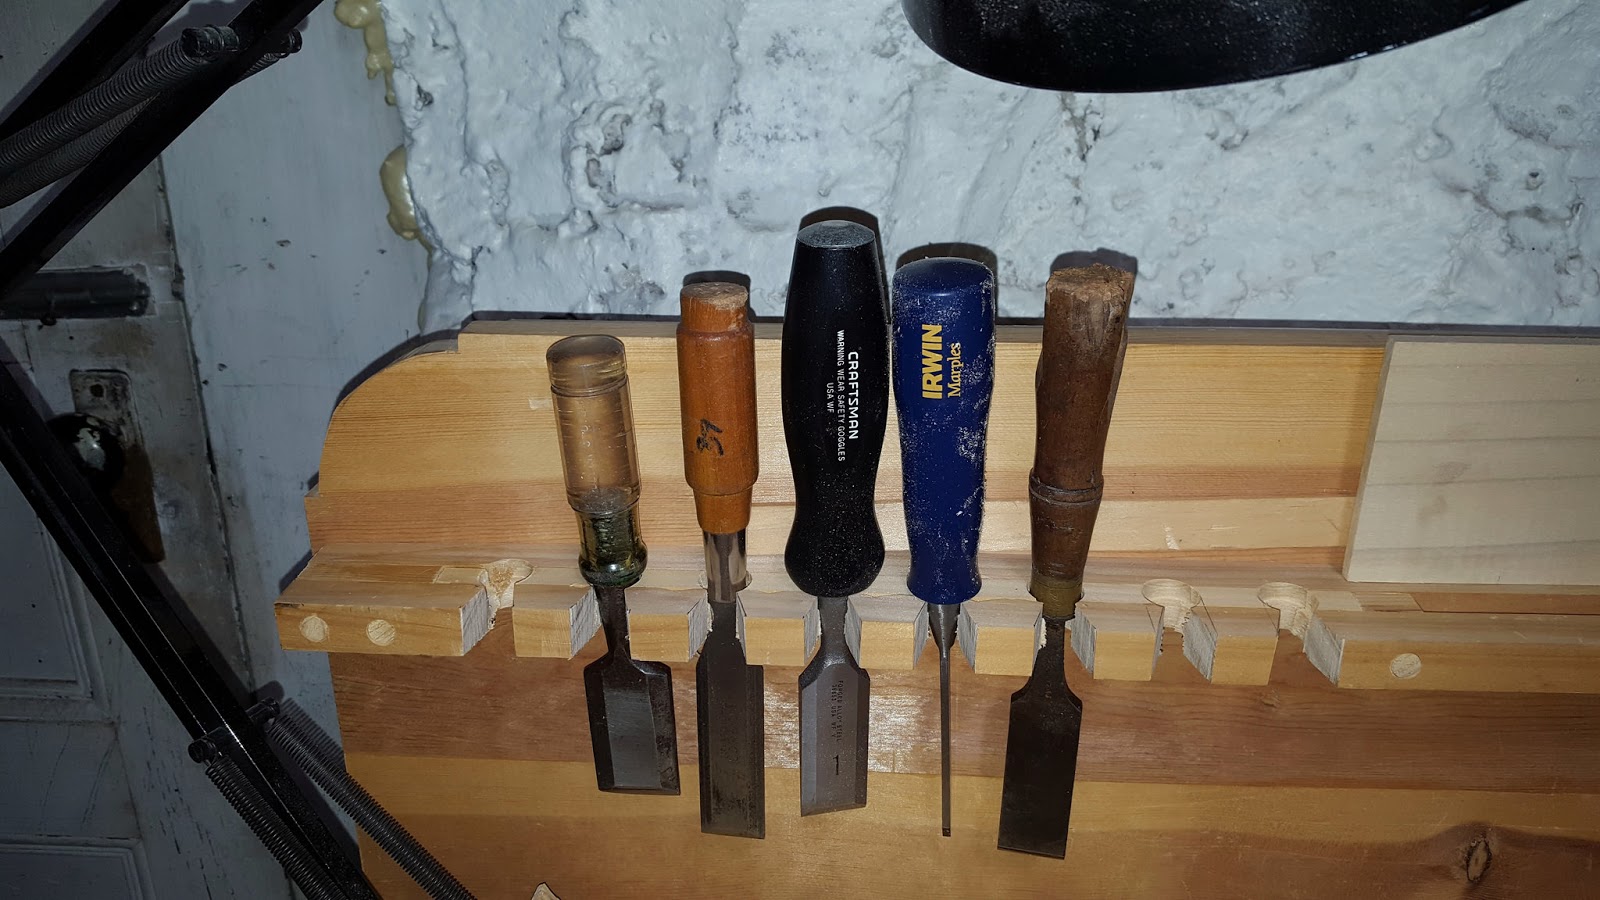
The first change I needed to make was to my tool rack.


As you can see if you look closely, the original tool rack is great for some things, but leaves chisels free to fall over any time I bump the bench, or hit something on it with a mallet.  I haven't actually nicked an edge yet, but it's only a matter of time.  Since I've wanted to try out a standard chisel rack for a while, this seemed like a good opportunity.

I started by gluing a new piece in to close the gap.  As I was doing it, I realized that the whole process was going to end up leaving it really fragile, but it should last long enough to let me decide whether I like it or not.


I wanted to use my bench for something else while the glue dried, so I left it pegged to the back of the bench, wrapped twine around it tightly, and held the end of the string with a spring clamp.  It worked quite well, and was tight enough that I had some squeeze-out, despite the filler piece not being a particularly tight fit.

While that was drying I sharpened one of the chisels that had been on the rack, cleaned, sharpened and reassembled a low angle block plane I'd been putting off working on, and started working on a saw rack for behind the back panel.

Once the glue was dry, I removed the whole rack from the back panel, then drilled 3/4" counterbores about a quarter of an inch deep, then smaller holes all the way through.  Cutting notches for the chisels to slide in was tricky, because the second cut on each slot was cutting through an unsupported and fairly narrow pillar with two questionable glue joints.  A great deal of care and a very light hand with the saw got me through it, though, and I was able to put the rack back on.


As you can see, it worked fairly well.  Those five chisels don't actually fit in my tool chest (I didn't leave much space for extra chisels when I built it), so I'm pleased that they've finally got a storage rack that will keep them reasonably safe.  At some point I'll need to remove that end of the rack entirely and redo it correctly (that is, using a solid block of wood instead of gluing up layers.

The saw rack behind is even simpler:  I cut a piece of 1/2" poplar to length, and glued some spacers to it before screwing the assembly to the back of the panel.  I'll try to get some pictures of the whole setup in use tonight.

Wednesday, September 21, 2016

What have I been up to?

I obviously haven't been writing much here, but I have still been getting in some workshop time.  Here are a few of the things I've been occupied with.

1) Combination plane storage!  I bought a new combination plane; I found a deal I couldn't turn down, and it turns out I like it a lot more than the other one I had.  My one complaint is that the cutters came stored in a canvas roll, which is great, but not actually big enough.  I may end up buying some canvas and making a larger roll, but for the moment I'm building some storage boxes in the style of the old Stanley combination plane storage.  Here's the first one done:


After making it, I realized that Stanley didn't actually put dividers in.  I think probably I'm going to go that route as well, since the dividers vastly increased the amount of time this took.  Also, I really should be putting the cutters in with their edge up.  Just at the moment, they're not actually sharper at the other end, so it's a minimal concern.

2) Experimenting with splines.  I'd never actually made a box with splined corners before, and I wanted to try it.  I don't actually have a "finished" photo, but here's one from along the way.


The splines are cheap veneer of some sort, the sides are poplar, and the top and bottom were pine, all chosen because they were what I had.  Fortunately, it turns out that my dovetail saw leaves a kerf only slightly wider than the veneer is thick, so I can cut a slot and then glue in the veneer.

I screwed up the hinges, so I'll need to go back and try that again, but I'm pretty pleased.

3) Buying and playing with moulding planes!  While I was out of the shop injured this summer, I wound up finding a bunch of inexpensive moulding planes on Etsy, and a few more at antique stores.  I also went out this weekend and bought four more from Craigslist.  At the moment, I'm averaging about $20 each for the moulding planes, and they've been in fantastic condition.  A couple of them could use some wedge tweaking, but aside from that all of them are entirely useable.


Looking a little more closely, we have:


 The first four are the ones I bought a few days ago.  Left to right, there is a matched tongue and groove set, a beading plane, and a #2 hollow, which is remarkably straight.  The grooving plane needs some work on the wedge... it was clearly added by someone who was using the plane for decoration, and doesn't fit very well.  On a side note, I could with that everyone who bought these things for decoration took care of them this well!  The guy I bought them from said he'd "refinished them", which seems to mean he sanded lightly and then put on a couple coats of BLO.  They look a lot newer than the rest, but are probably of similar vintage:  the match planes were made by the Ohio Tool Company, the beading plane is by Sandusky, and the hollow has no legible maker's mark.

The next two I picked up at an antique store.  The hollow is in good shape, and cuts fairly well, although the back of the cutter could use some polishing, and the grooving plane has lost its mate.  Sadly, it doesn't match the other set, so I suppose I'll have to build it a match.


The two on the far left here both came from other antique stores.  One is another bead, which I believe started its life as a reeding plane.  At some point one of the boxwood inserts was broken, and someone planed what was left flat and nailed a fence to the body.  Now that I have a couple of beading planes, I may try to restore that.  The other is a dado plane in terrible shape.  It's missing the front wedge, the depth stop isn't straight, and there's something weird about the way the (skewed) cutter was ground.  I mostly bought it because I'd never seen a dado plane in person, and figured it would make a reasonable pattern even if I didn't ever get around to fixing it up.

The next four all came from Etsy.  There are two profile moulding planes, another beading plane, and a very neat moving fillister plane.  The nicker needs some work, but everything else works perfectly.  I may actually do a short post about that one sometime... it's got some features that seem to be a little unusual.


You can see the depth stop on the moving fillister a little bit, here: it's a rounded, moderately decorative piece that's held in place by screws at the front and back.  Getting it even is a little fiddly, but once you lock it down it's fantastic.

After that are three new planes.  Two of them are a Mujingfang hollow and round, which are neat, but don't fit my hands as well as I'd like.  They were a gift, and they are occasionally useful, so they get to stay on the shelf.  After that is a no-name plane that's basically a 7/8" straight rabbet.  It needed some tuning, and shavings tend to get jammed in it as you work, but with a little practice it has turned out to be quite useful.  I love it for making things like pencil boxes:  it's a lot lighter than a Stanley 78, and doesn't require any setup.

The last one on the shelf is a 2" wide skewed rabbet that I inherited from my father's father.  It's dented, heavily checked, and the sole was beaten up and about 3 degrees off square when I got it.  The iron could use a little more work, but I flattened and squared the sole, removed the worst of the rust from the iron, and it now works quite well, at least for rough work.  The mouth is pretty wide, and I haven't had the motivation to make an insert for it yet, so it's not great for fine work.  For a wide rebate, though, it'll remove a vast amount of waste very quickly.  I think I had it removing about 1/16" on a stroke when I was testing it, which is pretty absurd.


So that's what I've been up to.  How about you?


Thursday, August 18, 2016

A few of my favorite (wood working) books and videos

There are a lot of woodworking books out there:  some are good, some are bad, and some are just weird.  Last week, someone asked me what books I'd recommend, and I had to stop to think about it.

After consideration, here are some of my favorites.  This list isn't anything near exhaustive, nor am I making any claim that everyone who wants to be a woodworker should read them.  They're just what comes to mind when I think about what books have been valuable to me, in no particular order.

1) The New Traditional Woodworker, by Jim Tolpin.  For my full review, click here.  Jim Tolpin looks a lot at how to set up a functional workflow, and what tools are necessary if you're going to use all (or mostly) hand tools, and includes directions on how to make some basic jigs and tools you'll want.  This one is fairly easy to find, and an excellent starting point.

2) The Anarchist's Toolchest, by Christopher Schwarz.  For my full review, click here.  I'm always a little leery of recommending this one, despite how much I like it.  Chris has a weird sense of humor, and a philosophy that's a little unusual.  That said, I really like his theories on tools and tool use, and I think there's quite a lot of value in the book overall.  His tool list gives not only what he recommends, but why, which I found very helpful.  Overall, I think he gives a pretty good basis for hand tool work.

3) Working Wood 1 & 2: the Artisan Course with Paul Sellers, by Paul Sellers.  Paul Sellers was the first person I got to watch doing hand work in person, which left me with a soft spot for his teaching style.  The book walks through basic tools, and then starts working on projects (a spoon, a stool, a dovetailed box, and a few other things), covering the three basic joints, what tools to use, and so on.  He definitely has an anti-machine bent that comes through in the book, but there's more than enough good information in the book to be worth reading past that.  I also strongly recommend watching his videos, which are mostly available on YouTube.  He mostly does a very good job of explaining what he's doing, and they're fairly short.

4) The Joiner & Cabinetmaker, By Anonymous, Christopher Schwarz and Joel Moskowitz.  This is a good look at what woodworking was like before the era of common powertools.  There were mills to produce boards, powered by water or steam, but an individual shop wasn't likely to have anything powered on hand.  The book walks you through the work of an apprentice in a good joiner's shop, and talks about tools, their use, and habits that a good woodworker should get into if they want to be successful.  Later in the book, Schwarz goes through each of the projects presented in the original text, which is also quite useful.

5) Anything by Roy Underhill.  I love his writing style, and while he's frequently short on details, there's enough information to figure out what he's doing.  I think his videos are stronger, and some of the more recent seasons are available through the PBS website (http://pbs.org/woodwrightsshop).  He also teaches classes, if you're lucky enough to live near him.  The Woodwright's Apprentice is probably the book of his I appreciate the most, but everything I've read has been worth the time.

6) Woodworking Forums.  There are a lot of good forums out there, and even if you never log in to ask a question, you'll learn a lot from reading them.  At the moment I mostly visit WoodworkingTalk.com, LumberJocks.com, and SawmillCreek.org.  And if you have specific questions, there are always people with answers on those forums.

As I said, this is nowhere near an exhaustive list.  It's really just my first reactions when someone asks me what to read.  They've been helpful to me, though, so they may also be of use to you.

There's one key thing to remember, though:  Nobody has all the answers.  Woodworking is, in many ways, an idiosyncratic hobby, and different people will find that different techniques work for them.  If you don't like the way one author has you cutting dovetails, find another author.


Search Result

s

Tuesday, August 2, 2016

How you work determines how you think.

We've all heard it:  "When all you have is a hammer, everything looks like a nail."  It's sort of true, though.  One thing I've realized as I worked more with hand tools, and which I've mentioned before, is that a lot of things are simpler.  Not necessarily easier, but simpler.

I was just reading someone's blog posts about making a "Milkman's Bench", and they were talking about needing to be sure the grooves they milled for the tail vise were exactly 1/2".  "Why?", I thought.  "Just cut the tenons on the moving part once you've done the grooves, and the exact size won't matter at all!"  Except that's harder with power tools.  If you're cutting your tenon with a dado stack, you need to know exactly how high to set the blade, or you'll run into trouble.

In a different post, they were thickness planing to make sure that the pieces were exactly 1 5/8" thick.  "Why?", I asked myself again.  Well, because the parts are being made from a cut list.  If you're cutting everything from a list, then doing assembly, it's a lot easier to make sure everything is identical before you start doing assembly.  In non-machine work, it's kind of irrelevant what the actual size of any of the parts is, because it's trivial to just size each piece to fit the one before.  Maybe you end up at 1 11/16", or 1 7/8", but it doesn't really matter.

For me, it's now easier to treat dimensions as a guideline, an ideal that I don't really need to achieve unless I'm building a piece of furniture to fit a specific space.  Other than that... So what if I'm a few sixteenths off? I'm going to plane everything flush when I'm done anyway.

Now, please don't get me wrong.  This isn't a condemnation of power tools, or a statement that people are in some way "wrong" for building to exact dimensions.  If you're using power tools, it really is a better/easier way to work.  I think a lot of hand tool workers would be baffled by the idea of cutting everything to exact tolerances, and the power tools folks would be baffled by our failure to measure anything precisely.  Neither way is better.

The point is that the tools we use determines how we think about things, and how we approach problems.

I'm not dead yet!

The splint is off, the occupation therapist tells me I'm so close to 100% that there's nothing more she can do to help, and my back is recovered enough that I can consider time at the workbench without cringing.  All that means that it's time to get back to work, and to writing!

I have a few projects in mind for the next couple of months, and two of them tie neatly into the "Woodworking on $1.50 a day" series.  Those two are a Japanese-style toolbox and a small, portable workbench (the "Milkman's Bench", from Popular Woodworking).  I'll definitely be doing writeups of those.

The third is, potentially, an enormous nightmare.  I'm looking at replacing some of my old particle-board shelf units with Jefferson book-boxes, which is a LOT of dovetailing.  I'm initially looking at two stacks, probably around 12 boxes or so.  If they go well, though, I may be trying to make enough for all of the books in our house... I've got no idea how many books that actually is, but I'm pretty sure we broke 3000 paperbacks quite a while ago. So I'll have to consider carefully before actually starting this project.

In any case, I hope to be writing something meaningful again soon!

Thursday, June 9, 2016

A break in posting...

.. and in my finger.

Sadly, all of my projects have been put on hold, because I've got a splint on my left hand for the next few weeks.  So I haven't forgotten this blog, it's just painful to update it.

Thursday, May 26, 2016

Woodworking on $1.50 a day -- Part 4.5: Hand Planes, Part 2

In Part 4 of the "Woodworking on $1.50 a day" series, I wrote about an inexpensive "Hong Kong" style wooden plane.  I did so largely because it's really nice, as a beginner, to buy a tool and start working, especially when you don't exactly know what "well set up" feels like.

If you're not into the "tap it with a mallet" school of plane adjustment, you do have one other option that can (if you're lucky) be even less expensive, which is to buy used.  If you luck out you may find a nice old plane for $10-25 at a yard sale or flea market.  The problem is that it's not going to look very nice at that price.  It's going to be rusty, the handle or tote may be broken, and the cutting edge may be more of a mashing edge, with big nicks in it.  This may be something you can fix.

If you're going to buy an old plane -- and I certainly have, and will again! -- here's what you should look for.

1) Size.  The common sizes are usually referred to by the numbers Stanley gave them.  Here they are:

  • #4.  The most common, used primarily for smoothing.  9" long, 2" wide.
  • #3.  A smaller smoother.  8" long, 1 3/4" wide.
  • #5.  A jack plane:  you'll mostly use it for removing a lot of material quickly.  14" long, 2" wide.
  • #7 or #8.  A jointer, 22" or 24" long.  Use it to make the edge of a board straight.


2) Brand.  There are hidden gems in every brand, but there are also brands where you can pretty much rely on the tool having once been excellent.  I'd trust anything made by Stanley before the second world war, and anything made at any time by Millers Falls.  How do you tell if it was made before World War 2?  Good question!  Sadly, there's no easy answer.  There's a flowchart here that may help, but may not.  Record also made some good planes, as did Sargent.  Just to add to the confusion, all of those companies made planes for Craftsman at various points.

2) Condition.  This is more likely to matter.  Here's what you want to see on a smoothing plane.

  • A smooth sole.  Rust is fine, pitting is not.
  • Mostly smooth sides.  A little pitting won't hurt anything, but make sure it's not too extensive.
  • A smooth cutting iron.  Say it with me:  Rust is fine, pitting is not.  (At least within a half inch of the cutting edge.)
  • A long cutting iron.  Some of the older planes had a short piece of hard steel welded to a long piece of either softer steel or iron.  If the iron is too short, there may not be any hard steel left, which means it won't cut.  EDIT:  As TaDaMan points out in the comments, overall length is fairly irrelevant.  What really matters is the distance between the cutting edge and the slot for the cap iron screw.  
  • A cap iron that fits closely.  Again, some rust is OK, but the end closest to the cutting edge should fit tightly against the blade.  You can fix it if it's a little off, but it should be pretty close.
  • No missing parts.  A tote (handle) or knob (front handle) that's cracked can be glued together.  One that's missing entirely will have to be replaced somehow.  On most of these planes there's a lever that lets you move the blade a little bit side to side.  If it's missing, you're likely to have trouble.
What planes would I recommend?  I most commonly use a #3, #5, and a transitional (wood body, metal adjustment knob) 24" jointer.  Most people prefer a #4 to a #3, but I'm weird.

I'd recommend starting with a #5 or a #7, and I'm well aware that that's an unusual recommendation.  Here's why:

Smoothing with a plane takes a lot of skill and a well set up tool, and sanding is easy.  There's no way around it.  A really good tool will compensate for only a little bit of skill, but first you have to get it really well set up.  That's hard to do if you only have a little bit of skill.  For me, at least, my first year or so working with a #4 was infuriating.  No matter how hard I tried, I couldn't get it to work.  I eventually went to a class and found out that part of the problem was the tool, and part was technique.  It drove me nuts until then, and still does, occasionally.  So I don't think you should start with a smoothing plane.

A jointer, on the other hand, is relatively easy to use.  You put a board on edge (I'll talk about workholding in my next $1.50 a day entry, I think), and you run the plane from one end to the other.  You'l need a little practice in keeping it square and not creating a bow instead of a straight line, and a lot of people find that a fence helps a lot, but that's pretty much all it does.  It's easy to learn to use, and the initial setup isn't as fiddly.  Conveniently, it also solves the problem that ripping a board (cutting it to be narrower) with a handsaw leaves a rough edge that isn't always straight.  I realize it's counter to what just about everyone else says, but I think you should start with a jointer.

A #5 can do a lot of things.  On boards shorter than about two feet, it can make a pretty good jointer.  On large boards, it can make an OK smoother.  If you curve the cutting edge, it can take out big chunks of wood if you go cross-grain, which is nice if you have a thick board and want a thinner one.

Anyway.

Once you've bought a plane, it's probably going to need some work to make it usable.  There are a LOT of sources on how to do the repair work.  Almost all of the ones I've seen are good.  I'm going to include a pointer here to one video, by Paul Sellers.  Why this one?  A few reasons.

First, it's long.  He covers pretty much the whole process over the course of the video, including a lot of conversation about how much perfection is necessary.  At the end of the video, you'll know a lot about how a metal hand plane functions and how to clean and assemble one.  Still not much about how to use one, but at least you should have a decent picture of how to get started.

Second, I enjoy his no-frills approach.  He's spent something like 50 years as a professional woodworker, and has stripped a lot of the craft down to bare essentials.  I like that in a teacher:  give me the critical, no add-on skills first, and THEN I can learn the more complicated ways to do things.

Third, I like his accent.  He's British, and I like listening to him.  It's a minor thing, but it doesn't hurt.


Wednesday, May 25, 2016

Thinking about my leg vise

When I built my bench in 2012, I decided to go with a leg vise for a couple of reasons.  First, it was something I could do with parts I could go buy that day.  Second, it looked simple to assemble.  And finally, I'd learned to hate standard metal face vises while dealing with an old one I'd been using.  (That turned out to be more an issue with how I was using it than with the vise, by the way.)

I didn't like the idea of having to bend over to move a pin around as is standard, and I also didn't want to cut a mortise through three and a half inches of very dry Douglas fir.  So I came up with a mechanism that would let me adjust it by lifting a piece of wood with my foot while I tightened or loosened the chop.  It worked quite well up until a few months ago, when the wooden bar started wearing away from the constant pressure.  Looking at it, I think I have two decent options.

1) Upgrade what I have.  The aluminum bar (See the last photo in this post for some information about it) is fine, and the only real problem is the pine 1x2 that's wearing away.  I could replace it with something harder, and it would be fine.  Maple, maybe, or more aluminum bar.  It's an easy option, and I know it would work.  But the system has some shortcomings, and I've started thinking about alternatives.

2) Move to a cross-based mechanism.  For some unknown reason it's usually called a St. Peter's cross, despite actually looking like a St. Andrew's cross.  I like the way they work, when they do, and I appreciate the design involved.  The problem is the mortises I'd need to cut.  The chop on my bench is made of pine, and is pretty weak as it is:  I routinely bend it trying to get a good grip on something.  So routing out a big strip along the vertical center will leave it pretty weakened.  I can replace the chop, of course, but it's an annoyance.  It occurred to me, though, that it may not actually need that big a slot.  A narrow (1/4" or so) slot a half inch deep would do to allow a piece of steel bar to slide without slipping sideways, and a piece of 1/4" steel rod through it would spread the load out significantly.  So I might need to give this a try, as soon as I can figure out how to cut a stopped groove that long in the bench leg and chop.

Tuesday, May 17, 2016

Woodworking on $1.50 per day -- Part 4: Hand planes #1

So here we get to the first of the really iconic tools.  Almost everyone involved in woodworking, even if they're mostly a power tool woodworker, seems to see the hand plane (specifically, a Stanley-style metal plane) as one of the major symbol of fine woodworking.  I'm not really convinced of that for a power tool shop, but whatever.

This is not the post I intended to write.

The post I intended to write talked a lot about how you just can't get decent hand planes for a low price, and how you were going to have to either accept a dramatically sub-standard tool or resign yourself to lots of saving and lots of watching flea markets.  And if you were going to stick purely with European ("Western") style planes, that would still be true.  However.  I wrote a review last week of the Mujingfang 11" Jack Plane, and I've been forced to change my mind.

So what do I think now?

In the Stanley numbering system, there are are lot of oddities.  However, from #1 to #8, the planes get progressively longer, wider, and heavier, starting from the cute little #1 smoother to the #8 jointer.

The most common planes in the middle of the range are probably numbers 3, 4, and 5.  Three is a small smoother:  I happen to prefer it for most things, but that's personal preference.  It runs about 8" long and 1 3/4" wide.  The number four is also a smoother, running 9" long and 2" wide.  The number five is the first one that's usually called a "jack" plane, and is 14" long by 2" wide.

The Mujingfang Jack is sort of an odd size by that standard, since it's called a Jack but is 11" long with a 1 3/4" wide blade.  So the blade is the width of a #4, with a length halfway between a #4 and a #5. The mouth is relatively small, and it's never going to be a fantastic plane for removing a ton of waste.  So why do I like it?  It's sharp out of the box - sharp enough to take the hair off my arm --, and adjusts more easily than any other wooden plane I've used.  I finally (FINALLY!) get why people say adjusting wooden planes isn't as hard as it looks.  Now I know what I'm shooting for with my older tools.  It's very light weight, and it leaves a good surface behind.  Honing it a bit will probably make that even better.

Recommendation

So for month four, I suggest one of two options:

1) Buy the Mujingfang 11" jack.  It runs a little bit over the budget, but I'll try to come in under for month 5 to balance that out.  It can be pushed to remove a significant amount of stock, or you can take off very fine smoothing shavings.  And it's long enough to act as a jointer for short boards, which is nice.  I've read that a plane should be able to straighten a board twice as long as its sole, which means about 22" for this plane.  With practice, you can extend that significantly.  If you really can't swing $51, you could try their shorter 7" smoothing plane.  It's $44, but my guess is that it will be significantly harder to use to get a straight edge on a board.  I also haven't tested it, so I can't make an informed recommendation.  Or you could wait one more week.

2) Head to flea markets, yard sales, antique stores, and the like, and find a Stanley #4 or #5, or equivalent from some other brand.  Buying used is always tricky, and it may take some work, but you may find a gem of a plane for a lot less than $45.  I would suggest avoiding eBay, at least in the beginning:  it's hard to judge whether things are really in as good condition as the ad copy says.  Maybe they are, maybe they aren't.  I've had some good luck, and some really bad luck.

What can I do now?

This is where things get really neat.  Now you can smooth and straighten boards that you've ripped.  You can resaw small boards and wind up with half- or quarter-inch stock, which you can smooth with the plane.  So all of a sudden small boxes are possible, and you can build things that aren't limited to the dimensions of commercially available lumber.

You now have a set of tools that can realistically build a nice workbench, a long-lasting toolchest, or quite a lot of furniture.  You'll still have some trouble with housing dados and grooves, but they're doable.  Mortise and tenon joints should be possible, at least in sizes matching your chisels.  With the addition of a plane, you can now chamfer edges, reduce the thickness of table tops, or a lot of other things.

I'm going to try to make a few quick projects over the next few weeks to demonstrate what can be done, but for now, just start practicing.  Rip a 1" wide strip off a board (along the grain), then use the plane to smooth and straighten it.  Once you're done, do the edge of the original board, and strip another piece off.

Keep practicing, make some boxes, and enjoy!

Thursday, May 12, 2016

CTR 12: Mujingfang Rosewood Plough Plane

This is a review of Mujingfang's plough plane.  I'm going to start off by saying that if you can afford a more expensive option, something like the Veritas Small Plow, you should go with that instead.  But since that sells for $275 with 5 blades, and the Mujingfang sells for $66, they're not really competing in the same market.

If you're reading this and don't know what a plow plane is, it's a tool used to cut grooves in a piece of wood.  Think of the grooves in a frame and panel door, or the ones that hold the bottom of a drawer in place.  Normally they're used with the grain, although if you cut the edges of the groove with a knife or saw they can go across the grain.  Some (although not this one) have cutters ahead of the main iron to make them work better across the grain.

Where, and How Much?

I bought mine from Woodcraft, at this link here.  Full retail is $66 no matter where you buy it:  Amazon, Newegg, Woodcraft, wherever... it's always $66.  It's also always sold by Woodcraft, so there might be a connection there.

What do you get, and What's the Construction Like?

You get the body, fence, arms, and five blades, sized 1/8", 3/16", 1/4", 3/8" and 1/2". The sizes are actually Imperial sizes, not metric, so they should match your chisels if you're buying in the US.

Construction is decent, but not fantastic. It's a fairly simple tool: the body has a metal (presumably steel) skate set into it, and the wedge matches the throat quite well. Adjustment is simple, and the fence is reasonably stable.

There are, however, a few minor issues. The first is with the fence: The fence is held in place by what seems to be a serrated piece of metal, with a bolt through it. By tightening the wingnut, you pull that serrated piece of metal up, and it grips the arm. However, loosening the wing nut doesn't actually push it down... it just loosens the nut. A light tap with a mallet (or on the top of your workbench) loosens it fully, though, so it's a nuisance that you'll probably stop noticing fairly quickly.

The other issue, which is a bit more substantial, is with the skate. On the copy I bought, the front skate was ever so slightly too far back, and the back of the iron just barely touched it. Obviously that meant shavings couldn't escape, and so the plane didn't work at all. As soon as it started cutting it would jam. I fixed it with about two minutes of work with a file, rounding off the back corner of the front skate. That resolved the problem entirely. It's possible I just got a bad one, but it certainly indicates their quality control isn't perfect. You should be able to see the issue here. As I said, a little bit of careful work with a file cleared up the issue entirely. If you're planning to take very heavy cuts, you'll want to take off more of the skate, but I took off maybe 1/32" or a touch more, and that was plenty.


Other than that, it's pretty nice.  The irons fit well and mate with the rear skate quite well, the wedge fits, and the fence (once you've correctly loosened the screw) slides easily.  One thing I did notice is that the arms aren't quite parallel, so if you pull the fence all the way off you'll need to squeeze them together just a touch to get it back on.  Not a big deal, and it means the fence doesn't slide around when the nuts are loose.

 How does it work?

Overall, I'm reasonably pleased.  It's fairly easy to adjust, the fence appears to stay where it's put, and the irons seem to cut well.  One thing to be aware of is that the fence has no inclination to stay parallel on its own.  I recommend using a chisel or setup blocks to make sure you've got it set up correctly.

I would say that, overall, it's not quite as nice as the Sargent-made combination plane I have.  It does a better job of dealing with shavings (it spits them out the top, rather than forcing them out the side towards your hand), but it has no depth stop at all, adjustment is more difficult, and I suspect that the fence will eventually stop holding.

But it does do the job, and if you can't afford a modern combination or plow plane, and you don't have the time or ability to restore an old one, it's a pretty good choice.

Final Thoughts?

As I said, a modern or restored plow plane will do the job more easily and reliably.  But the Veritas Small Plow with five irons costs $275, while the Mujingfang version costs $66.  At a price difference of over $200, I'd go with the Mujingfang until I could find a decent used combination plane.  It does the job, looks like it will remain reliable, and is definitely cost efficient.

Would I buy another?

That's hard to answer.  If I had no plow plane at all, and needed one at a low price, then yes, I would.  Or if I needed one to use in conditions where it might be lost or damaged, then sure:  I'd rather lose this than an expensive one, and as I said, it does the job.

Friday, May 6, 2016

CTR 11: Mujingfang Rosewood 11" Jack Plane

This review is of a tool I really didn't expect to like, the Mujingfang 11" Jack Plane.  Based on their marketing information, Mujingfang basically went out and found people who were making decent tools locally, and brought them together in Hong Kong to make planes for the international market.  Is that true?  Who knows!  All I can do is review the tools.

Straight out of the box, no handlebars.

Where, and How Much?

I bought mine at WoodCraft, catching it on a 15% off sale.  The 11" Jack is usually priced at $51.00 everywhere I've seen it.

What do you get, and What's the construction like?

What you get is:
1) A plane body
2) A double iron (meaning an iron with a chipbreaker)
3) A wedge
4) A rod that's supposed to go through the body side to side.  It's not in the photo above, because I forgot about it when I was taking pictures.

Construction is remarkably good, given the cost.  The sole is flat to within the limits of my measurement, and the wedge is a pretty decent fit.  It could be better, but it's good enough.  The rod tapers slightly, so it only fits through one way, and sticks about halfway through.  I'll be honest... I'm not really sure what the value of the rod is.  It seems to make it slightly easier to grip when pulling, but that's about it, and I mostly don't pull a plane.  There is one oddity, which is in the iron.


You may be able to see, down near the sharp end, a line of bronze-colored metal.  The blade was made by welding a piece of A2 high speed steel (according to the advertisement) to a piece of softer metal.  It's not terribly unusual, and it's not bad, but it does look kind of strange.  The weld also wasn't cleaned up very well, and there are some "splatters" of something on the front of the blade.  They don't affect the function, so I'm not going to worry about them.

Fit is excellent, but finish is mixed.  The iron is well sharpened (shaving sharp, right out of the box in my case!) but shows marks from the grinder.  The surfaces where you'll handle the plane are smooth and cleanly finished, but the throat and wedge are fairly rough.  Again, none of it compromises the function of the plane, but it shows where corners were cut to save some money.  Since they clearly pass some of that savings on, I can't really complain.

 How does it work?

Very well.  To be honest, I'm quite surprised at how well it performed.  While I wasn't able to take a terribly thick shaving, which I'd like to be able to do with a jack, it's perfectly adequate for taking an edge from rough-cut to ready to finish.  I probably managed to get up around a 32nd in thickness before it clogged, so it's fine unless you're trying to reduce the width or thickness of a board substantially.  It's enough different from my metal planes that I'm going to assign most of my problems to inexperience:  I wasn't able to cut a perfectly square edge without a lot of care, and I also pretty thoroughly failed to make the edge straight.  Again, though, both of those are issues with the user, not the plane.

Here are the critical things:  The iron was sharp, adjusting it was relatively simple, and the wedge can be tapped in tight enough to keep the iron from shifting in a heavy cut while still backing out easily with some hammer taps at the heel.  Incidentally, don't use a metal hammer for that:  I use a cheap soft-face mallet I bought at Harbor Freight for hitting the heel or wedge, and a very light steel hammer to advance the iron.  Brass would probably better.

I tested it  in pine and red oak.  In both cases it left a smooth, clean surface.  I imagine it would work as well in just about any furniture wood.
Rough cut edge.
Finished edge.  (Ignore the face... I didn't touch that.)

Final Thoughts?

Absolutely worth it.  Learning to adjust a wooden plane can be an adventure, but this actually adjusts more easily than any other I've tried.  I'm actually considering buying the smoother, and putting these in a light-weight travelling tool kit.  It weighs dramatically less than the Stanley #5, although the blade is a bit narrower and the sole is a bit longer.

Would I buy another?

Absolutely.  I can recommend this one with a clear conscience.
Absolutely.

Tuesday, April 26, 2016

Intermission

I had planned to publish the next month of "Woodworking on $1.50 per day" last week, but time got away from me.  The good news is, one of the things that happened over the weekend was a sale at Woodcraft, which may have changed dramatically what I was going to write.

I've just ordered two tools I've been wondering about for a couple years.  Both are planes by Mujingfang, who have a reputation for building decent, reliable tools.  One is their plough plane, which is cheaper than the next best option by... maybe a couple hundred dollars, new?  It normally runs about $65, and was 15% off.  The other, which is much more relevant, is their 11" jack plane.  Since I was planning to write about how it's impossible to find a new plane at a good price, and it runs about $50, now I'll have a chance to test whether I can still say that.

I expect them to arrive sometime next week, or over the weekend if I'm extremely lucky.  So you can expect the next post in the series then.  In the meantime, I hope to find time (and scrap) to build a toolbox like the one I suggested building.  If so, I'll post some photos and a build log.

Monday, April 11, 2016

Woodworking on $1.50 per day - Part 3

Here we are, entering month three.  You've spent the past month or so learning to cut dovetails, trying to figure out how to cut a housing dado with your ryoba saw, and hopefully making some shop furniture.  This month, we're going to make life easier by getting some marking tools.

A lot of people will tell you that you should spend a fortune buying marking and measuring tools, and that you need accuracy of .001" over a foot, and you need to buy a super expensive square to be that accurate.  In my view, that's nonsense.  You'll get that much movement in your board over the course of an hour, just from changing temperatures.  Yes, accuracy is important.  Yes, reliability is important.  But it doesn't have to be THAT good.  Here are some suggestions:

Square

Assuming you live in the US, buy an Empire True Blue 16" Combination Square.  They're inexpensive ($14 at Home Depot, and only a little more on Amazon), easy to get, and mine has remained accurate for something like 6 years now.  This gets you a good square, a good 45 degree marker, and a 16" steel rule.  It'll be a little awkward for small parts, so consider supplementing it with their 6" version at some point later.  For right now, it will do.  EDIT:  Both of my Empire squares have retained accuracy for over a decade, now.  I'm still using them, and I'm still happy with them.

Marking Gauge


I'll be honest:  I'm torn here.  The next tool you need is a marking gauge of some sort, and I'm unsure what to recommend.  So instead of a single recommendation, I'll give you a few choices, cheap to expensive.
  • Harbor Freight Mortise Gauge:  At $10 it's the least expensive of the lot.  It's also the cheapest.  If you go this route, open the package at the store.  Check to make sure the sliding arm is actually perpendicular to the fence when it's locked down, that it actually locks down, and that all three pins are there.  I have one, and I use it regularly, but it's sometimes frustrating because it's not really a precision tool.  Also, you'll want to file the pins down to a football cross-section, and use very little pressure when making the first mark.  It works, but it's not great.
  • Rockler or Wood River Wheel Marking Gauge:  If you have a Rockler or Woodcraft nearby, you can pick up one of their house branded gauges for about $17.  A wheel marking gauge is usually easier to set and use, and they'll almost certainly hold their setting better.
  • The Veritas Wheel Marking Gauge:  This is the best of the lot.  It's my most used gauge, and it's fantastic.  It's also over $30.
As I said, I'm not really sure how to go.  I think, in the end, I'd recommend buying one of the cheaper options, which will leave you enough money for item 3.  Probably go with the Rockler or Woodcraft gauge:  they seem to get good reviews, and are certainly higher quality and easier to use than the Harbor Freight version.

Marking Knife

A marking (or striking) knife.  Something like the one by iGaging will make your life a lot easier:  the spear point means you can get the blade flat against your rule or whatever you're using to mark, and they're pretty inexpensive.  Another option is a folding knife:  I went this route, with the Stanley 10-049 Pocket Knife, which is recommended by Paul Sellers.  It's easy to store in a shop apron pocket, and being able to close it means it'll stay sharp longer.  On the downside, I wasn't able to find any source for them except Amazon, which means you'll have to order it.

What can I do now?

To be honest, that hasn't changed much.  When I started this series, I wanted to prioritize tools that would get you working as quickly as possible, since most people aren't thrilled about spending three or four months buying tools they can't actually use.  The difference this month is accuracy.

A good square will enable you to do layout much more accurately:  if you can lay the line more precisely, you'll wind up with straighter cuts and parts that fit together better.  A marking gauge will make cutting rabbets or dovetails simpler, because it will be easier to mark the width of the rabbet or depth of the tails.  A marking knife makes a more precise line than a pencil or pen, and opens the option of using a knifewall to guide your saw, which is more accurate than just trying to cut on a line.

Basically, this doesn't let you do anything new, but it helps you get better at what you were already doing.

Thursday, April 7, 2016

Woodworking on $1.50 per day - Projects!

I said this was the month where you could realistically start making furniture, and I wanted to back that up and make some suggestions for projects.

1) A tool box.  If you didn't already make a tool box in month 1, start now!  I recommend a Japanese style toolbox.  There's a good video showing how they work here:


Why?  Because they're relatively simple, they can be made out of commonly available materials (1x10 and 1x2, for instance), and they don't have many difficult cuts.  If you're careful making your cuts, you shouldn't need anything but wood, nails, a saw, and a hammer to put one together.

You could also build a Dutch-style chest, which is my personal preference, but that involves some angled cuts, dealing with hinges, and things like that.  It's still doable with these tools, but it's not easy.


2) A bookshelf.  If you follow this link, you'll find some photos of a book case from the book "The Anarchist's Design Book".  While it would be a lot easier with a couple of extra tools, you could build something quite like it with the tools you have now.  Cutting dados with a ryoba is a pain (I've done it), and you won't be able to do tongue-and-groove joints for the back, but you can make something quite similar with a saw, a chisel, and a hammer.

3) You can actually make some pretty cool things.  I'm not recommending it as an early project, but here's someone making mitered full blind dovetail joints with a ryoba, a quarter inch chisel, and a half-inch chisel.

Monday, April 4, 2016

Woodworking on $1.50 per day - Part 2

It's been a month since you last went out to buy tools, and you're getting tired of nailing joints together.  You really want to cut some better joints, but you're not sure how to get started.  Well, that's what this month's purchasing is, so let's get going!

Month 2

This month we're going to find some chisels and sharpening tools.  This is where you get to make some choices.

Chisels:

For chisels, you want bevel-edge chisels in at least 1/4" and 1/2" sizes.  Adding a 1" chisel will make your life easier, but isn't necessary for a lot of things.  If you look at Amazon, you can get Irwin Marple chisels for $8-$9 each.  That's about $18.  I'd recommend buying a 1/4" and a 1/2", and spending the rest of this month's budget on sharpening stones.  If you don't want to order from Amazon, Sears and Home Depot have similar chisels at similar prices.  You can also keep an eye on thrift stores, flea markets, and yard sales:  those are a bit risky, because you're not really going to have the tools to restore a badly damaged chisel, but you might find a fantastic deal.

Keep in mind these are not high-quality tools.  They're not going to be very sharp out of the box, and they probably won't hold an edge all that long.  That said, I worked with a set of Craftsman chisels for a few years, and while they sucked, they still worked.

Sharpening:

Talking about sharpening is like tap-dancing through a minefield.  Given a budget of about $25, though, you're pretty limited.  Given that, I'm going to go with the two cheapest initial cost options.  There are a lot of excellent videos on how to sharpen, so I'm not going to cover it here.

Sandpaper:

First things first, you need a flat surface.  There are two cheap ways to get one, although neither will be perfect.  First, go to a home store and buy a granite floor tile.  They should run around $5-8, and will be flat enough.  The second option is to talk to a granite supplier.  See if they've got an off-cut too small to sell as a countertop, but big enough for your use.  You probably want something around 8"x2" at a minimum, and ground smooth on at least one side.  Larger is better.

Next, you should be looking for sandpaper.  You want wet/dry paper, and for routine sharpening you can probably start with 400 grit.  I'd go 400, 800, and 1000 grit.  If you want to, you can go up to 2000, but I mostly didn't bother when I was using sandpaper.  When you go to sharpen, drip some water or windex on the paper, set it on the granite plate, and sharpen.  

So what's the catch?  The catch is that while the initial investment is low, the long-term cost is high.  Yes, sandpaper is cheap, but the cost adds up.  You can't use the same sheet for very long, or you'll run into issues where half of the cutting edge is sharp and the other half isn't.

Oilstones:

Oilstones are a slightly larger initial investment, but not horrible.  You can get a three-grit set on Amazon for around $25, which is just within our budget.  Similar options may be available at local stores, or they may not:  it's hard to guess in any given area.  You're mostly going to want fine and extra-fine grits, not the coarse one.  That's really for working on a damaged blade, which hopefully you won't have.

Is there a catch?  I've never used that particular set, so I don't really know.  In all honestly, I greatly prefer a diamond plate, and so I've switched to that exclusively.  But they're not cheap:  the combined price for the set I have is something like $150, which is absurd for a $45/month budget.  If you have a windfall, sharpening tools would be a great way to spend it, but for now just put it on your "someday when I'm rich" list.

What can I do now?

The addition of chisels makes a big change.  You can now cut dovetails, for instance.  For practice, I recommend buying a piece of 1x4 or 1x5, and cutting a set of dovetails every day for at least two weeks.  Try to get a little better every day, and fix something that didn't quite work right the day before.  At the end of two weeks or a month, you're likely to be cutting them fairly quickly and quite accurately.

So that means you can make dovetailed boxes, or drawers for a case that's nailed together.  You can make housing dados and rabbets if you're careful, which means you can make a pretty solid book case.  You can now make mortise and tenon joints in softwood, and in hardwood if you're cautious.

This is, honestly, the point where you can start making furniture.  You don't have a smoothing plane or a big range of sandpaper grits, so making fine furniture is a challenge, but you can make things.  For that matter, you now have the critical tools for making a workbench:  I didn't have much more than this when I built my small bench.

So spend the next month practicing sharpening and making joints, and I'll figure out what you should buy next.

Tuesday, March 29, 2016

Woodworking on $1.50 per day - Part 1

I recently saw another "I want to start wood working, but I really can't afford to spend much money" post, and it got me thinking.  There used to be good options for buying things gradually, but at this point it's pretty much high-interest credit cards or nothing.  There used to be books titled things like "Europe on $5 a day!", so I thought I'd do something similar.

Even as a college student, I probably could have put away a dollar or two a day, so I'm going to think of the available money as $45/month.  It's a nice round number to work with.  Before I go any further, though, I'm going to try to address the cost vs. quality problem.  With woodworking tools, you generally get what you pay for.  On $45 per month, you're not going to be buying heirloom tools.  You're going to be buying tools that you'll probably start wanting to replace after a couple of years.

So what's the value here?  Aren't you just throwing money away?  Well, yes.  You are.  But not everyone can afford to buy top line tools from the beginning, and if you're going to insist on Lie-Nielson tools on even $5 per day, it's going to be years before you can get much work done.  This is a "Get in the shop as fast as possible" list.  You can keep the tools in a cardboard box until you build yourself a better tool box.  And now I'll get back on track.

What do we need to do?

To start with, what are the critical tools or operations?  In no particular order, here's my list.
  • A saw that can make rip cuts.
  • A saw that can make cross cuts. 
  • A saw that can make fine joinery cuts.
  • Chisels for shaping, cutting joints, etc.
  • Some sort of smoothing tool.  Card scrapers, hand plane, sandpaper, or whatever.
  • Marking tools... the usual choices being a marking gauge, marking knife, and so on.
  • Ways to drill large and small holes.
  • A hammer (for driving nails and just generally smacking things) and screwdrivers.
  • A way to make long board edges straight after being rip-cut.
  • A way to cut rabbets

The actual tools.

OK.  So that's a rough tool set.  Let's talk about actual tools, then.  As a guideline here, I'm going to go as cheap as I think is practical:  this is not a kit of heirloom tools.  This is a set that will let you get going as cheaply as possible, and which you'll replace over time as you come up with more cash.  I'm also going to try to think about order of operations here, so I'll split things up by month.  

Note 1:  I get nothing if you follow these links.  I get nothing if you don't follow these links.  I'm pretty much writing this for fun, and the only profit I get is the excitement of checking to see whether anyone has read this.
Note 2:  Prices are as of the day I wrote this.  I'm not going to keep updating, but the basics should stay pretty similar.

What am I including?

Before I start the actual list, a quick note.  I'm only including durable tools here;  no wood, even though it's a major cost.  Why not?  Because you can do quite a lot with cheap or free lumber.  Dimensional lumber from the home store, scavenged pallet wood, and things like that.  

Month 1:

This month, you're going to Sears.  No matter what you do, you're eventually going to need to drive nails and screws, so we'll deal with that and see what we have left.  First, pick up a 16oz Curved Claw Hammer.  The curved claws are good for removing nails, and I happen to like wood handles.  Also, it's about $5, which seems right for this project.  Next up, pick up a cheap 6-in-1 screwdriver.  I have this one, and it works fine.  It's about $9 right now:  if you see one that's cheaper, grab that instead.  You'll want #1 and #2 Phillips head, and 3/16" and 1/4" slotted heads, which most of that style have.  We're up to $14 here, so let's add a saw and call it a day.  I have a Shark brand Ryoba (there's a review back near the beginning of the blog), which I quite like.  At the moment Sears is listing them at about $29, so it will bring us up to $43 before tax.  I'll call that good!  If you're willing to splurge a little on month one, I'd add a few sheets of 180 grit sandpaper and a variety pack of nails.  That will bring you up to around $50-55, but allow you to start woodworking immediately.  You could also put off the screwdriver until next month... it's not really critical if you only have nails.

What can you do with this set?  A surprising amount, actually.

I'd start with a Japanese-style toolbox such as this:


Build it to the length of your saw, and ideally out of something like 1x10.  It will hold and protect your tools, but it doesn't need to be perfect.  All the joints are butt joints held together with nails, so there's no complex joinery.  It also doesn't have to be perfectly smooth, so sanding the ends of the boards with 180 grit sandpaper will be fine.  Just wrap it around a piece of scrap and get going.

This toolset will also allow you build a standard five-board bench, like this:


And that should be enough to keep you busy until it's time to think about your second month's purchasing...