Wednesday, October 30, 2013

Dutch Toolchest project - not quite done!

Just for once, I decided to do what all the cool kids are doing, and built myself a Dutch Toolchest.  It's kind of neat to be part of a crowd.  The project isn't quite done, but it's done enough to photograph.

I imagine anyone who finds this post will have already seen more than they want to know about the chest, so I'll just include this link to Christopher Schwarz's article about them.

I made a few changes, some of which may cause trouble in the future, and some of which are already causing trouble.

Construction:
The construction is standard:  I had a lot of 1x12 pine lying around after tearing up a workbench that was left behind by the previous owners of my house, so I used that.  So far I've managed to avoid buying any parts at all for this chest, and I'm hoping to keep it that way.  The shelves are set into dados in the sides, and the front and back are simply screwed on.  In the near future I'll add a chain or cloth tape to hold the lid open, but for now it just leans on whatever I've put behind the chest.  The boards for the back are shiplapped, since I didn't have a good set of irons for doing tongue and groove.  And now, on to the photos!  (click any of them to get a full sized image on Flickr)

Click here to see full size on Flickr


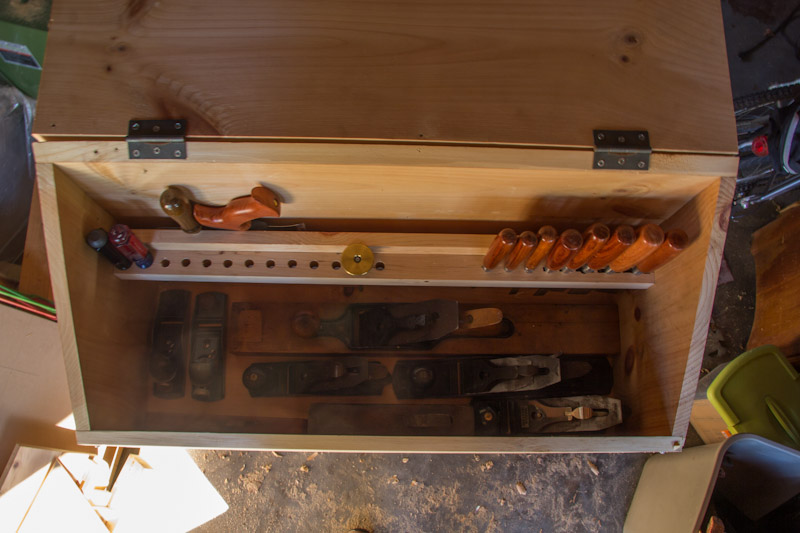
The Top Compartment:


Click here to see original on Flickr

As you can see, there's a LOT of space in there.  In this photo, it's holding:
  • 8 Chisels, ranging from 1/4" to 1 1/2".
  • 2 Screwdrivers;  one is a standard size flat-head, the other is a 4-in-1 type.  I'll be adding more screwdrivers later. 
  • A wheel-type marking gauge.
  • 2 Joinery saws, a gent's type dovetailing saw and a Veritas carcase saw.  I'm planning to add a 14" tenon saw to that eventually, but for now these do what I need.
  • Planes!  Fitted in the bottom of the compartment are:
    • A 24" transitional Siegley try plane.
    • A Stanley #5 jack plane
    • A Ward's Master #4 smoothing plane
    • A Stanley #3 smoothing plane (I use this more than the #4 these days)
    • Two block planes, one Stanley and the other Craftsman, both regular angle.
    • A 2" skew rebate plane
    • A 1" straight rebate plane.
  • Not present in the photo is my shop apron, which gets folded and set on top of the planes.
There's a stretch of open space next to the chisels, which I'll drill as necessary to hold other tools.  I'd like to add some mortising chisels to my tool kit, and I'll probably need to drill odd-sized holes for those, and my Yankee screwdriver will also need a much larger hole than the rest of my screwdrivers.

You can see I made one major change from the original chest here:  I added a false back to mount the tool rack on, and store joinery saws behind the false back.  Once I've worked out where I want them, I'll slide thin partitions down between the saws and tack them in place.  That should give the teeth more protection than they have in the Schwarz version, and give me an easy way to re-adjust what saws are where.

The Bottom Compartment:


Click here to see original on Flickr


The lower compartment is a lot messier, and I'm hoping to change that.  I'm starting to think I may want to add a drawer or two to hold small tools:  a stack at one end would hold drill bits, my #78, and parts for the combination plane quite nicely, with plenty of space left for everything else.

In the photo, you can see:
  • A Sargent made combination plane, and a roll of irons for it
  • A Stanley #78 moving fillister plane
  • A box of Forstner bits
  • A hammer and a plastic mallet
  • A brace
  • A 16" combination square
  • The tip of the carcase saw from the top.
 I'll be adding at least one more brace, a roll of auger and other bits, and an eggbeater drill.  That might be all that needs to fit, but I'm not sure.

What's left?

Since the title of this post indicates that there's some work left to do, I might as well mention that.

The first thing that remains to be done is adding a way to mount panel saws inside the lid.  The fact that I moved the tool rack forward means I don't have space to mount them the same way Christopher Schwarz did, with two saws stacked together.  Most likely what I'll do is add brackets that hold both saws flat against the lid.  If there's space, I'd also like to put that 16" combination square there, but I'm not going to count on it being possible.  As part of this, I need to remove the lid and create mortises for the hinges to sit in.

The second thing is building a drop panel for the front.  My intent has been to set that up the way everyone else does, with a simple latching mechanism and a removable panel.  I'm now thinking I might want to do something a little different, and hinge it so it stays attached.  That would let me pull things out and use the front panel as a small surface to, for instance, unpack the #78 and put it together.

Possibly before that, but certainly before finishing, I need to get some handles on this chest.  It weighs quite a lot, and right now it's basically impossible to lift without removing at least some of the planes.  Right now I'm thinking to use 1 1/2" square strips across both sides, with a hollow on the underside to get my fingers into.  I'd love to use quality iron lifts, but I'm still trying to make this work without buying any parts, and I don't have any lifts handy.

Finally, I want to paint the chest.  I have a few small tester-size cans of a dark blue paint, which I'll use after an oil-based primer.  The wood I used is fairly dirty, and I'd like that to not stain through the paint.


Wednesday, October 23, 2013

Current projects

I haven't written much here in a while, because life has been crazy.  I'm working again, which is great, but leaves me with very limited shop time.  Add in the fact that I keep scheduling my weekends for travel, and I have even less.

That said, I've made some progress.  I'm just about done with construction of my all-scrap Dutch tool chest:  it was made from the remains of a workbench which really wasn't useful to me (2x3 and 1x12 construction, and it wiggled when I pushed on it with one finger).  I even managed to scrounge enough screws to do most of the assembly.  I'll need to buy a few more screws, some hardwood for the lid-mounted saw rack, and one more board (probably) for the front panel, but it's basically done other than that.

So what's next?  A new bench.  The one I have is great:  it's heavy, it's solid, and I like the way it looks.  Unfortunately, it's in my unheated shop, where I won't be working for the rest of the year.  So I'm going to build a new one.  My intent is to make it portable:  either folding, or just something I can dismantle.

Right now, I have two ideas. 

1) The Roy Underhill "Woodwright's Apprentice" bench. I like the design, he claims it's stable, and removing a couple of screws lets the whole thing fold up.  It'd be pretty cool to be able to fold up my bench and slide it and my toolbox into the back of my car.

2) The Paul Sellers bench.  This would require some extra work:  it's not really designed to be broken down, though just leaving the legs separate and wedging them in place or something would probably work.  It wouldn't fold down into a single package, though.  On the plus side, I've worked at one, and I quite liked it.

Either way I don't feel the need for a tail vise (I may install a wagon vise, if I can find a way to make it not stick out at all on the end), and I'm OK with a limited front vise:  I'm actually considering just going with the frog design from the Underhill bench regardless of what else I do.

Regardless, it should be an interesting challenge.

Tuesday, October 8, 2013

Extremely old tools: Rabbt plane restore

Last summer, my uncle found time to go through the basement of my grandparents' house.  Since I'm the only woodworker in the family, he offered me all the possibly useful woodworking tools.  Some of them were really just not useful (used up chisels, seriously heavy-duty metalworking vises, things like that), but there were a few nice things.

Among them was a box with a bunch of hand planes in it.  Some of them were basically in new condition:  the Stanley #3 needed to be sharpened and adjusted, but that was about it.  The Stanley #78 may not ever have been actually used:  some of the parts still had what appeared to be packing grease on them, and it was all in the original box.

Then there were a few much older planes.  Among them were a coffin plane, which is in good shape except that the iron needs to be re-ground, and this.


Rabbet 01

It's a skew rabbet plane, in somewhat rough shape.    It's wide, too:  something like 2 or 2 1/2".  The iron has been sharpened down to almost nothing (there might be as much as 3/4" remaining before it's too short to use, but I suspect it's more like 1/2"), and the bottom was actually rippled.  I started out by getting the iron and wedge loose, which was quite a challenge.  The iron had more or less rusted in place, and I wound up having to smack it pretty hard with a hammer to get it to move.  Once it was out, I sanded it down.  The good news was that it had been kept at the right grinding angle, so I didn't have to regrind from scratch, just get rid of the rust and then sharpen.

Here's a photo from partway through:  you can see how much of the iron is gone.

Rabbet 02

I also touched up the wedge on sandpaper to get rid of the rust, but I did my best to avoid changing the shape at all.

Next up was dealing with the sole.  This was the part I was worried about.  I needed to remove something like a 1/8", which seemed impractical to do with sandpaper.  I knew, though, that the sole was a little shorter than the sole of my #5, so it seemed likely that I just joint it.  As it turned out, it worked fine;  really old beech planes nicely, and I managed to get the sole at exactly 90 degrees to the left side.  That should mean it will register correctly against the edge of a rabbet, and actually cut a square joint.  In the process, though, I discovered something unpleasant.

Rabbet 04

Yep, those are cracks that run all the way from the toe to the heel.  In the end, I decided to just leave it.  Right now the plane can be used;  it cuts smoothly, and feels solid.  If I ever have some hide glue on hand I may rub some into the joint, but otherwise I'll simply use it until it breaks.  At that point, I'll glue it back together and either keep using it or, more likely, retire it to a shelf as a reminder of my grandfather.

The downside to natural light

I love natural light.  My shop, at the moment, is half of my detached two car garage (the other half is, at the moment, storage and motorcycle parking).  That's fine:  on good days I get a ton of light, and I've placed my bench directly in front of the doors, so working there is a pleasure.

The problem is that I only have natural light.  See, there's not really any power to my garage.  There's a single bulb lamp on the outside, and a single outlet inside.  Neither one is grounded, and the wiring is left over from sometime probably in the 50s.  Sooner or later I'll run new (three conductor) wire and install lights and a couple more outlets, but for now, I can't work at night, or when it's heavily overcast.

Oh well.  At least I have a shop, and for most of the year it's a pleasure to work in.  That's really the important part, after all.

Tuesday, October 1, 2013

Back to the shop

It feels fantastic to be back in the shop.

It's been a crazy year.  First, I moved in January.  That involved quitting my job, selling my house, buying a new house, moving (you'll notice the gap in between... I lived in a miserable apartment for two months, December and January), and then discovering I didn't have a job in the new location.  So for the next six months I unpacked, job hunted, and did my best to relax and recover from my last job.  (It worked... my blood pressure dropped 20 points, both systolic and diastolic.)  Then I got a new job, which coincided with a social schedule of being gone every weekend for three months.

Today, I FINALLY got a day in the shop, and over the last few months I've bought a few new (well, used, really) toys.  The big ones were an old Millers Falls miter box, complete with the original Disston backsaw, and a Craftsman combination plane that appears to have been made by Sargent.  So, what to do?  Well, I started turning a pile of old lumber into a toolchest.  The lumber came from a workbench that was in the basement when we moved into the house, and while it looked good, it wasn't useful to me:  poking it with one finger (while it was loaded down with air conditioners, no less!) made it sway a good three or four inches.  For some things, that's fine.  For hand tool work, it's not really useful.  But it included six 30" and six 72" pieces of 1x12, and even if they aren't the best (lots of big knots and pitch pockets), careful cutting should yield a fair amount of usable lumber.

The chest I'm building is approximately the Dutch Tool Chest that Christopher Schwarz has made popular over the last few months(Link!).  As much as I love the full size joiner's chest, it won't work for me.  I need to be able to move my tools from the garage to the basement as the seasons change, and I'm so not carrying one of those big chests down the rickety outdoor steps into my basement.  The Dutch chest, on the other hand, I ought to be able to pretty much pick up and carry.

I didn't do much in the way of measuring for this chest.  My largest panel saw (8 TPI, filed rip) is about 28 inches long.  My longest hand plane is 24 inches long.  That means the inside needed to be about 29-30 inches.  Since I don't like ripping lumber, I'm going with the full width of the 1x12, and the height is a somewhat random 27".  I picked that based on the theory of "Hmm.  This seems like it should be easy to reach everything.  Why not?"  The length, including the sides, turns out to be almost exactly 31".

As to the joinery, I decided to take the easy way out, which also gave me an opportunity to try out my new combination plane:  the bottom, like the shelf, is set in a dado, rather than being dovetailed.  A dadoed, glued, and screwed joint should be just about as strong as it needs to be, and it meant I could get the majority of the work done in a day.  The one other real change I'm making is in how small saws will be stored.  I just don't like the saw till in the Schwarz version, so I'm adding a false back to the top compartment, and narrowing the base of that compartment so saws can be slid down behind.  I may end up regretting that if the joinery saws hang up on the panel saws in use, but I think it will work out OK.

In all, I spent a good six hours or so in the shop, and most of the complicated work is done.  I'll need to rabbet the boards for the back, screw them to the carcase, and do the same for the front.  Then it's a matter of adding a tool rack and lid, and figuring out how to get all my tools in.  Probably not more than another six hours of work, not counting the tool-fitting.

And it felt GREAT to be out in the shop again.